
Heaven’s Gate, what’s the cool name all about?
Introduction
- The following post is not finished yet!!! I’m posting it anyway because i don’t want it to root in a random directory waiting for get finished.
- Anyway, feel free to read and contact me if you have any question about this unfinished job.
Hello, my name is David, but you can also call me Ak3m4, i guess. Today, I will explain to you what is Heaven’s Gate and how this technique is utilized in malware. Since we are going to dive very deep on how this technique works, you and me will need to read some Assembly language and have a basic understanding of Windows internals. However, if you’re not very familiar with assembly or how Windows operates under the hood, don’t worry! I will do my best to make it easier for you to understand.
If I can’t make it a piece of cake for you to understand and you still have questions after reading, please fell free to contact me through one of my socials somewhere in this page (hope you can find them) and again, I will do my best to answer yours questions.
Here is how this article will be structured:
Terms
Throughout this article I’ll be using some terms I’d like to explain beforehand:
ntdll or ntdll.dll- these will be always referring to the native 64-bitntdll.dll, until said otherwise or until the context wouldn’t indicate otherwise.ntdll32 or ntdll32.dll- to make an easy distinction between native and WoW64 ntdll.dll, any WoW64 ntdll.dll will be refered with the *32 suffix.module!FunctionName- refers to a symbol FunctionName within the module.
Heaven’s Gate Overview
So let’s start with the simplest question, What is Heaven’s Gate? In short, Heaven’s Gate is a clever way for a 32-bit code to temporarily switch to a 64-bit mode. Okay, that’s relative simple, I get it, but why should i use it? Well, i guess the only use is to evade detection by security software and you will understand soon why i think that! So if you are a malware developer you may have a new technique in your arsenal after reading this.
The Heaven’s Gate technique will make your executable change its architecture to 64-bit, execute the necessary 64-bit code, and then revert back to 32-bit (if you want to) once it’s finished. This transition between architectures is complex, and due to it complexity, most tools used for analysing malware–such as debuggers, process monitors and automatic analysis tools like sandboxes–struggle to handle it effectively, so they end up crashing or producing a inaccurate reports.
To fully understand the Heave’s Gate, we need to first understand how Windows handle different architectures in the same Operating System, which is what makes the technique possible. We need also to understand the WoW64 software.
But first, A little bit of history for context!
History of Heaven’s Gate
Heaven’s Gate was first described in June 2009 on a popular VX website, by a guy named Roy G. Biv. I couldn’t find much about the guy and the link to his article unfortunately is dead. The only thing available from his article is the abstract, which says:
On 64-bit platform, there is only one ntoskrnl.exe, and it is 64-bit code. It also uses a different calling convention (registers, so called “fastcall”) compared to 32-bit code (stack, so called “stdcall”, old name was “pascal”). So how can 32-bit code run on 64-bit platform? There is “thunking” layer in wow64cpu.dll, which saves 32-bit state, converts parameters to 64-bit form, then runs “Wow64SystemServiceEx” in wow64.dll. But 64-bit registers are visible only in 64-bit mode, so how does wow64cpu.dll work? Here is what I call Heaven’s Gate, but first we must go back to ntdll.dll.
After that, in August 2011, the first malware to make use of this technique appeared, you can find its report here. Huh, this technique is almost as old as me and somehow is still being used today.
This technique emerged with the introduction of the 64-bit computing. A 64-bit operating system should support 32-bit applications, considering that many legacy systems, hardware, and software are based on the 32-bit architecture. To fix this issue, Windows operating system includes the Windows-on-Windows 64-bit subsystem (WoW64) that permits the execution of 32-bit applications on 64-bit platforms. Now we are getting into the important part of this article, the software that makes the Heaven’s Gate possible!
Windows on Windows64 Introduction
WoW64 was originally a research project for running x86 code in old alpha and MIPS processors in Windows NT 3.51 (Around 1995). When Windows XP came out as 64-bit system, WoW64 was included in the OS to support x86 32-bit applications. As for now, WoW64 has been involving and can support also running ARM32 applications and x86 applications on ARM64 architecture. So, in short, in a 64-bit system, all applications that are designed for 32-bit WILL run under the WoW64, which will “translate” the code from 32-bits to 64-bit and magically make it work.
Yes, you read it correctly, a bunch of mini mages that live inside your motherboard casting magic all day long is what make it possible, did you really believe rocks are meant to think? I’m just kidding, let’s go deeper in WoW64 software by seeing which DLLs are responsible for handling this transition.
Wow64.dll: Implements the WoW64 core in user mode. Creates the thin software layer that acts as a kind of intermediary kernel for 32-bit applications and starts the simulation. Handles CPU context state changes and the thunks for the kernel image (ntoskrnl.exe) entry point functions. It also implements file-system redirection and registry redirection.Wow64win.dll: Implements thunking (conversion) for GUI system calls exported by Win32k.sys. Both Wow64win.dll and Wow64.dll include thunking code, which converts a calling convention from an architecture to another one.
Some other DLLs are architecture-specific and are used to directly translate code that belongs to different architectures. Below are the DLLs responsible for emulating the machine code.
Wow64cpu.dll: Exclusive for x64, implements the CPU simulator for running x86 32-bit code in AMD64 operating systems and provides processor architecture-specific support for switching CPU mode from 32-bit to 64-bit and vice versa.Wowarmhw.dll: Exclusive for ARM64, implements the CPU simulator for running ARM32 applications on ARM64 systems. It represents the ARM64 equivalent of the Wow64cpu.dll used in x86 systems.Xtajit.dll: Exclusive for ARM64, implements the CPU emulator for running x86 32-bit applications on ARM64 systems. Includes a full x86 emulator, a jitter (code compiler), and the communication protocol between the jitter and the XTA cache server. The jitter can create compilation blocks including ARM64 code translated from the x86 image. Those blocks are stored in a local cache.IA32Exec.bin: Exclusive for Intel Itanium, contains the x86 software emulator.
Here is a image from the book Windows Internals Part 2 that can help you understand the use of each DLL,
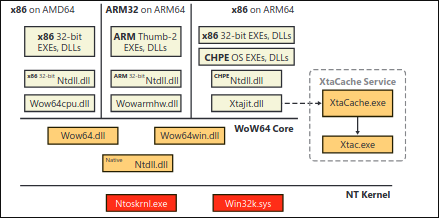
The XTA service present in the image is believed to handle translation caching or optimization for applications that require a specific compatibility layer to function efficiently, particularly in environments that involve emulation or architecture bridging (like running 32-bit apps on 64-bit systems), although i couldn’t find much about this service.
Note: Older Windows versions designed to run in Itanium machines included a full x86 emulator integrated in the WoW64 layer called
Wowia32x.dll. I decided to no include the DLL above because the Itanium architecture was officially discontinued in January 2019
These DLLs, along with the 64-bit version of the Ntdll.dll are the only 64-bit binaries that can be loaded into a 32-bit process. That’s because, in fact, on Windows x64, the first line of code to execute in any process is always the 64-bit version of the Ntdll.dll, which will take care of the initialization of the process in user-mode, by now, as a 64-bit process. This applies for all architectures - x86, x64 or ARM64. Only after this, WoW64 takes over loading the x86 of the Ntdll.dll (or the CHPE version, if enabled) which will take care of the initialization of the process, now as 32-bit process, which will start after a far jump changing the code segment. The 64-bit mode is never entered again, except when the process (32-bit) attempts to make a system call. When a 32-bit application attempts to make a system call, instead of directly using the ntdll32.dll to perform a sysenter, it actually executes a series of instructions to jump (the far jump mentioned) back into 64-bit mode. The system call is then handled there, in the 64-bit mode. Who did this? You already know, right?
The answer is: WoW64.
Read this you fuycking moron
Reversing system calls
In this section I’ll go through a brief overview what are system calls. After that, once you’re a bit more familiar with these terms we will create a simple program and debug it to see everything in action, how system calls are made, where the transition in the WoW64 appears and so on.
About the kernel, here is overview of what is the kernel from wikipedia. Understanding what is the kernel will help you understand the following content of the article.
A kernel is a computer program at the core of a computer’s operating system that always has complete control over everything in the system. The kernel is also responsible for preventing and mitigating conflicts between different processes. It is the portion of the operating system code that is always resident in memory and facilitates interactions between hardware and software components. A full kernel controls all hardware resources (e.g. I/O, memory, cryptography) via device drivers, arbitrates conflicts between processes concerning such resources, and optimizes the utilization of common resources e.g. CPU & cache usage, file systems, and network sockets. On most systems, the kernel is one of the first programs loaded on startup (after the bootloader). It handles the rest of startup as well as memory, peripherals, and input/output (I/O) requests from software, translating them into data-processing instructions for the central processing unit.
The critical code of the kernel is usually loaded into a separate area of memory, which is protected from access by application software or other less critical parts of the operating system. The kernel performs its tasks, such as running processes, managing hardware devices such as the hard disk, and handling interrupts, in this protected kernel space. In contrast, application programs such as browsers, word processors, or audio or video players use a separate area of memory, user space. This separation prevents user data and kernel data from interfering with each other and causing instability and slowness, as well as preventing malfunctioning applications from affecting other applications or crashing the entire operating system. Even in systems where the kernel is included in application address spaces, memory protection is used to prevent unauthorized applications from modifying the kernel.
System calls, roughly speaking, are an API provided by the operating system that allows user-mode applications to request hardware-level or privileged operations, such as reading or writing files, allocating memory, device communication and so on, provided by kernel. These operations are execute by the kernel after the transitioning the CPU from user mode to kernel mode, which provide a more secure, stable and efficient environment. If you want to know more about CPU rings, kernel and user mode, please take a look in this article from JC Serrano.
To make it clear as crystal, i made two simple programs with identical code but one key difference, one is compiled as 32-bit, while the other, is compiled as 64-bit :D.
So, let’s see how these two programs behave and spot its differences.
The code is responsible to make a attempt to CreateFile and WriteFile, which if everything works as expected, will create a file named example.txt containing the text Hello, syscall debugging!.
#include <windows.h>
#include <stdio.h>

int main() {
    // File name
    LPCSTR fileName = "example.txt";

    // Create or open a file
    HANDLE hFile = CreateFile(
        fileName,                 // File name
        GENERIC_WRITE,            // Desired access
        0,                        // Share mode
        NULL,                     // Security attributes
        CREATE_ALWAYS,            // Creation disposition
        FILE_ATTRIBUTE_NORMAL,    // Flags and attributes
        NULL                      // Template file handle
    );

    // Check if the file was created successfully
    if (hFile == INVALID_HANDLE_VALUE) {
        printf("Failed to create file. Error: %lu\n", GetLastError());
        return 1;
    }

    printf("File created successfully.\n");

    // Write some data to the file
    const char *data = "Hello, syscall debugging!";
    DWORD bytesWritten;
    BOOL success = WriteFile(hFile, data, strlen(data), &bytesWritten, NULL);

    if (!success) {
        printf("Failed to write to file. Error: %lu\n", GetLastError());
        CloseHandle(hFile);
        return 1;
    }

    printf("Data written to file: %s\n", data);

    // Close the file handle
    CloseHandle(hFile);
    printf("File handle closed.\n");

    return 0;
}
And after cross compiling it from my Linux to Windows using mingw tools, we are going to debug these two programs. Why cross compiling? Because i do not have that much disk space to download Visual Studio in my VM and cannot make any command line compiler to work on Windows without giving me three hours of headache because of errors :P.
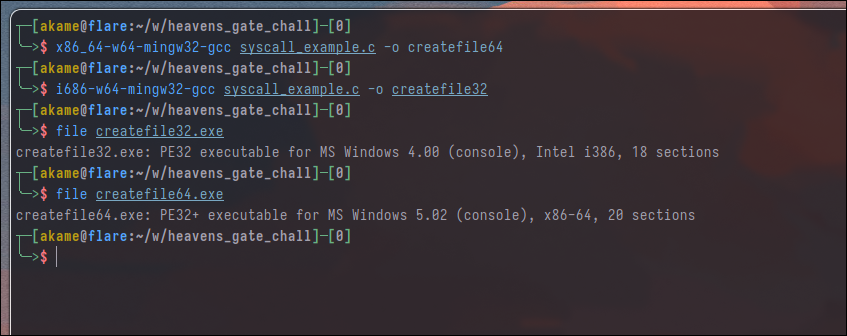
So, let’s start. We are going to start analyzing the 64-bit program and see what actually happens when a system call is made. First step is to start the x64dbg or a debugger of your preference and/or IDA or other decompilers.
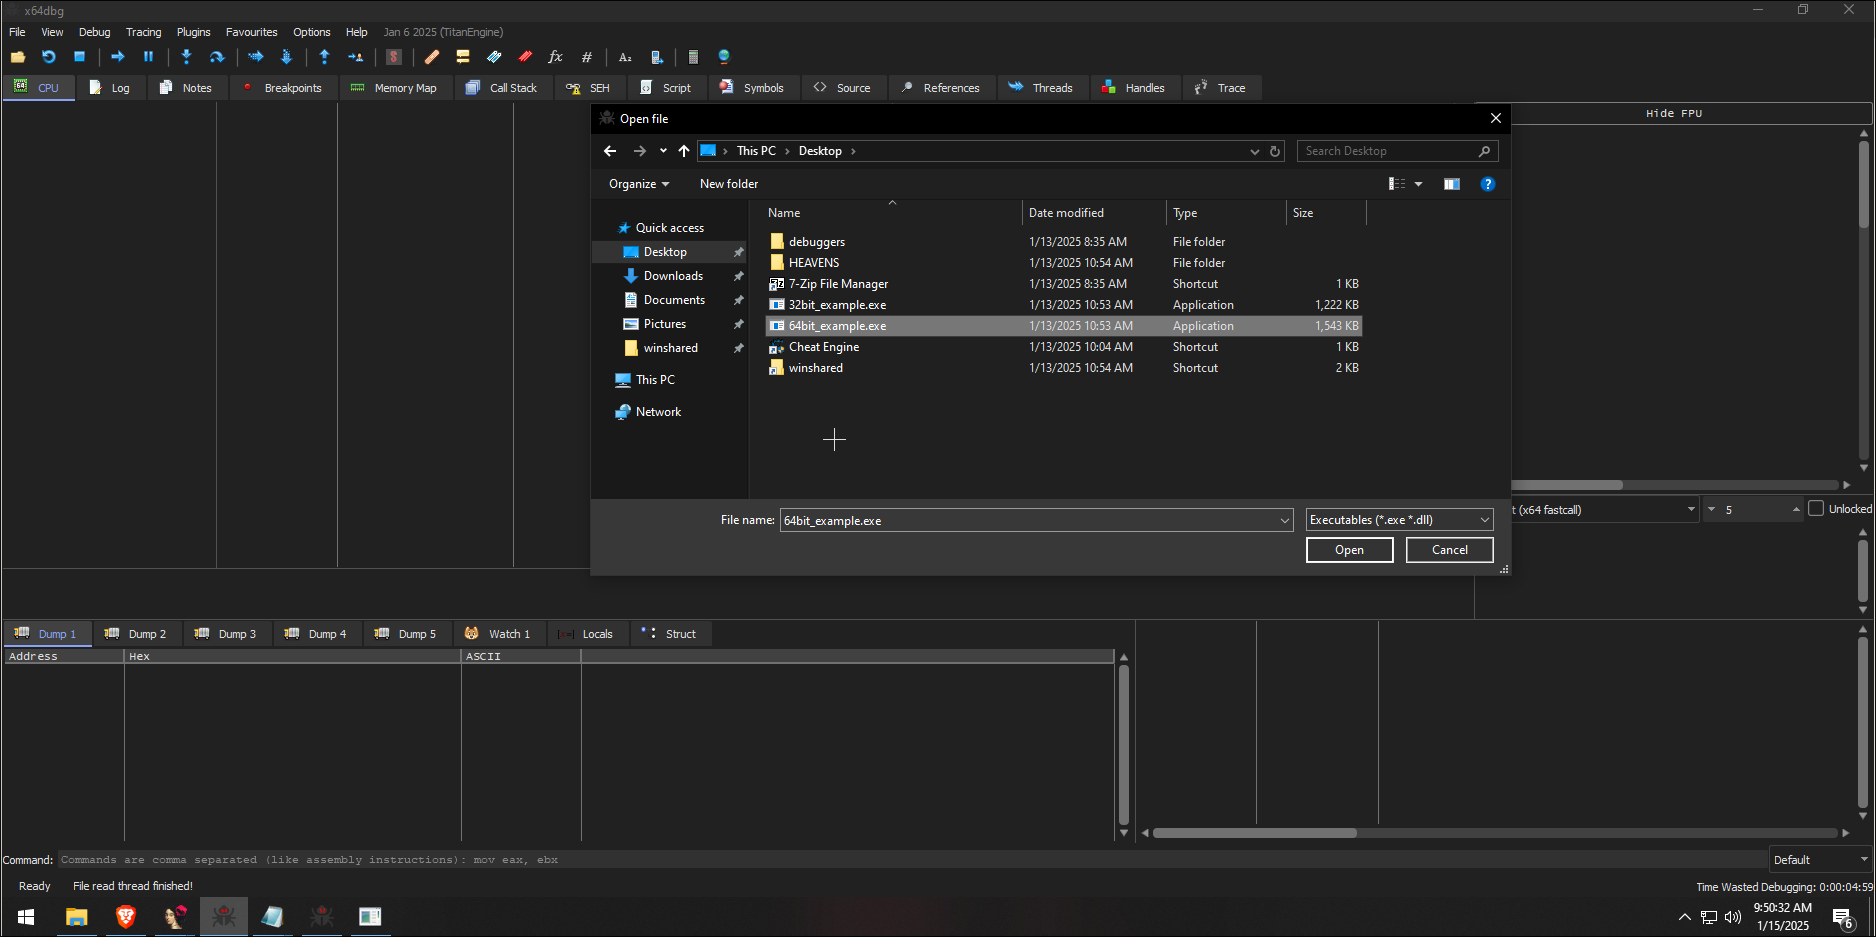
After loaded the binary in the debugger, you’ll see that we are, in fact, in the ntdll.dll. Once we let the ntdll.dll take care of the initialization of our process which we call the Birth of a process, we will stop in our binary. I will not cover The birth of a process in this article, since it’s quite complex and is a topic that is out of my expertise.
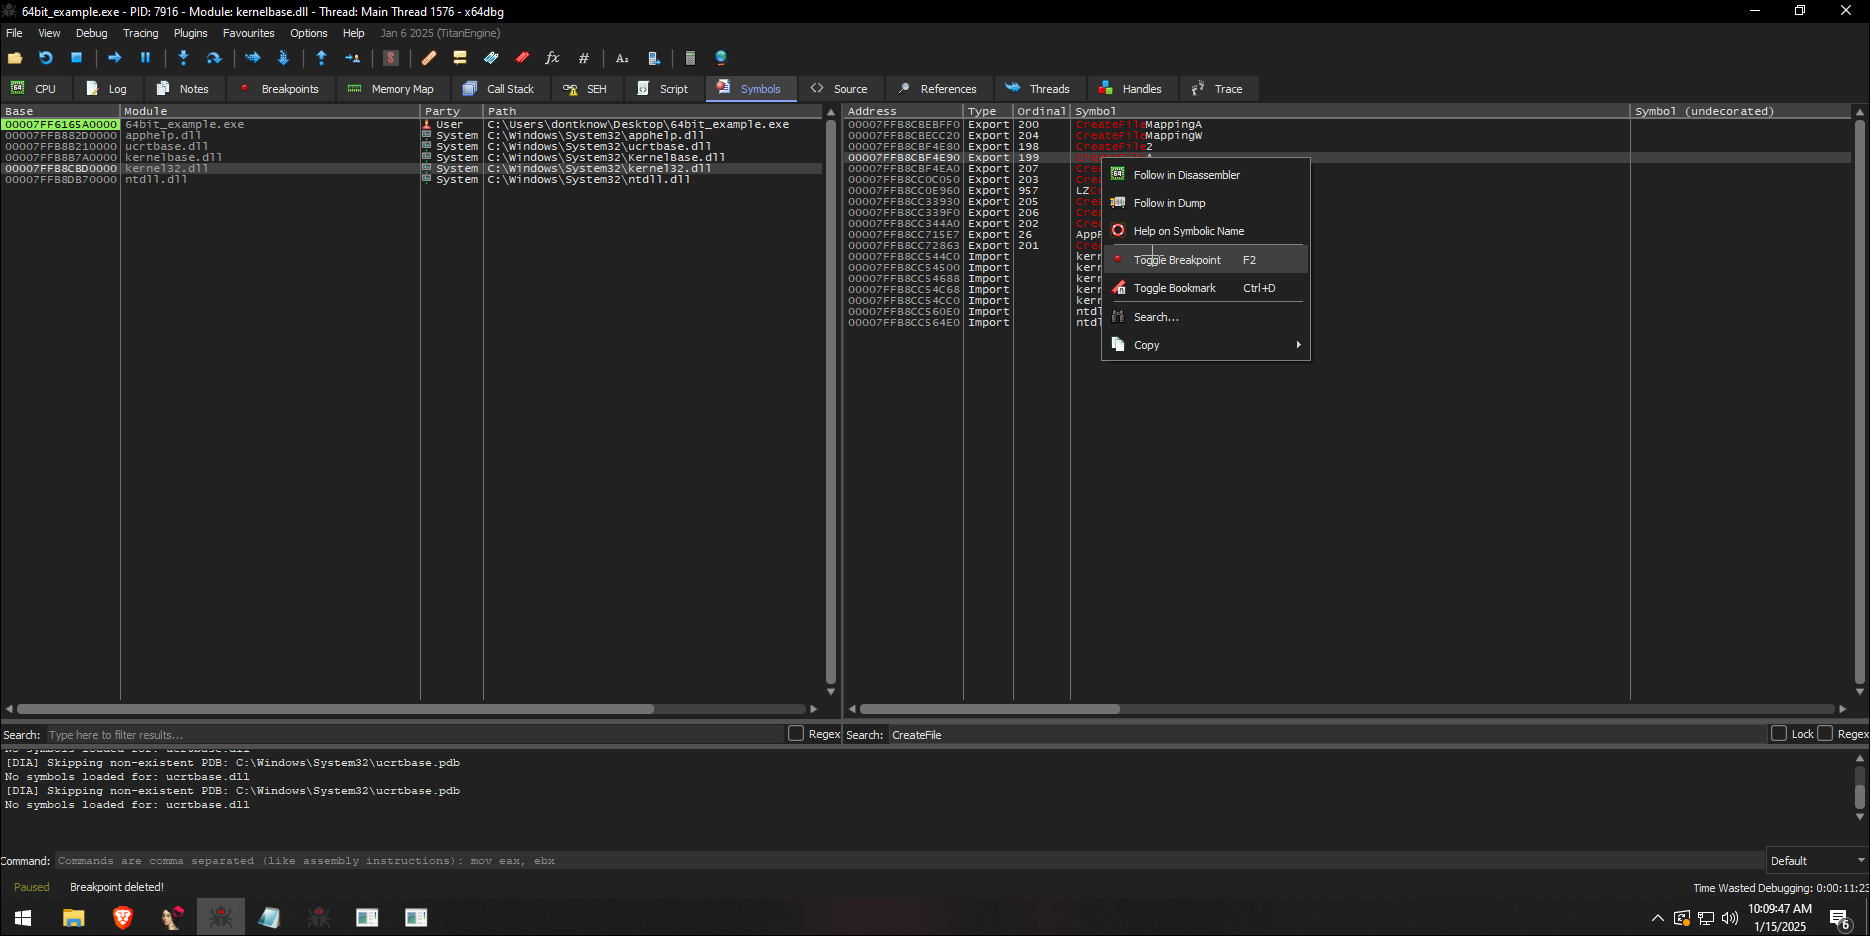
Since we already know which system calls we are using, we can easily put a breakpoint at the kernel32.dll!CreateFileA function by going to Symbols tab -> Selecting the desired dll -> Search text box -> Right Click and Toggle Breakpoint.
Go back to the CPU tab and press F9 multiple times until we arrive at our destination at the kernel32.dll, the dll name will appear at the debugger’s tab name and you should see the function name in your assembly code. So, what happened? The call to CreateFileA inside our binary lead us here, the first step of what is going to happen when we make a system call from a 64-bit process.

F9 again and you will see that we are no more in the kernel32.dll and the jump lead us to kernelbase.dll
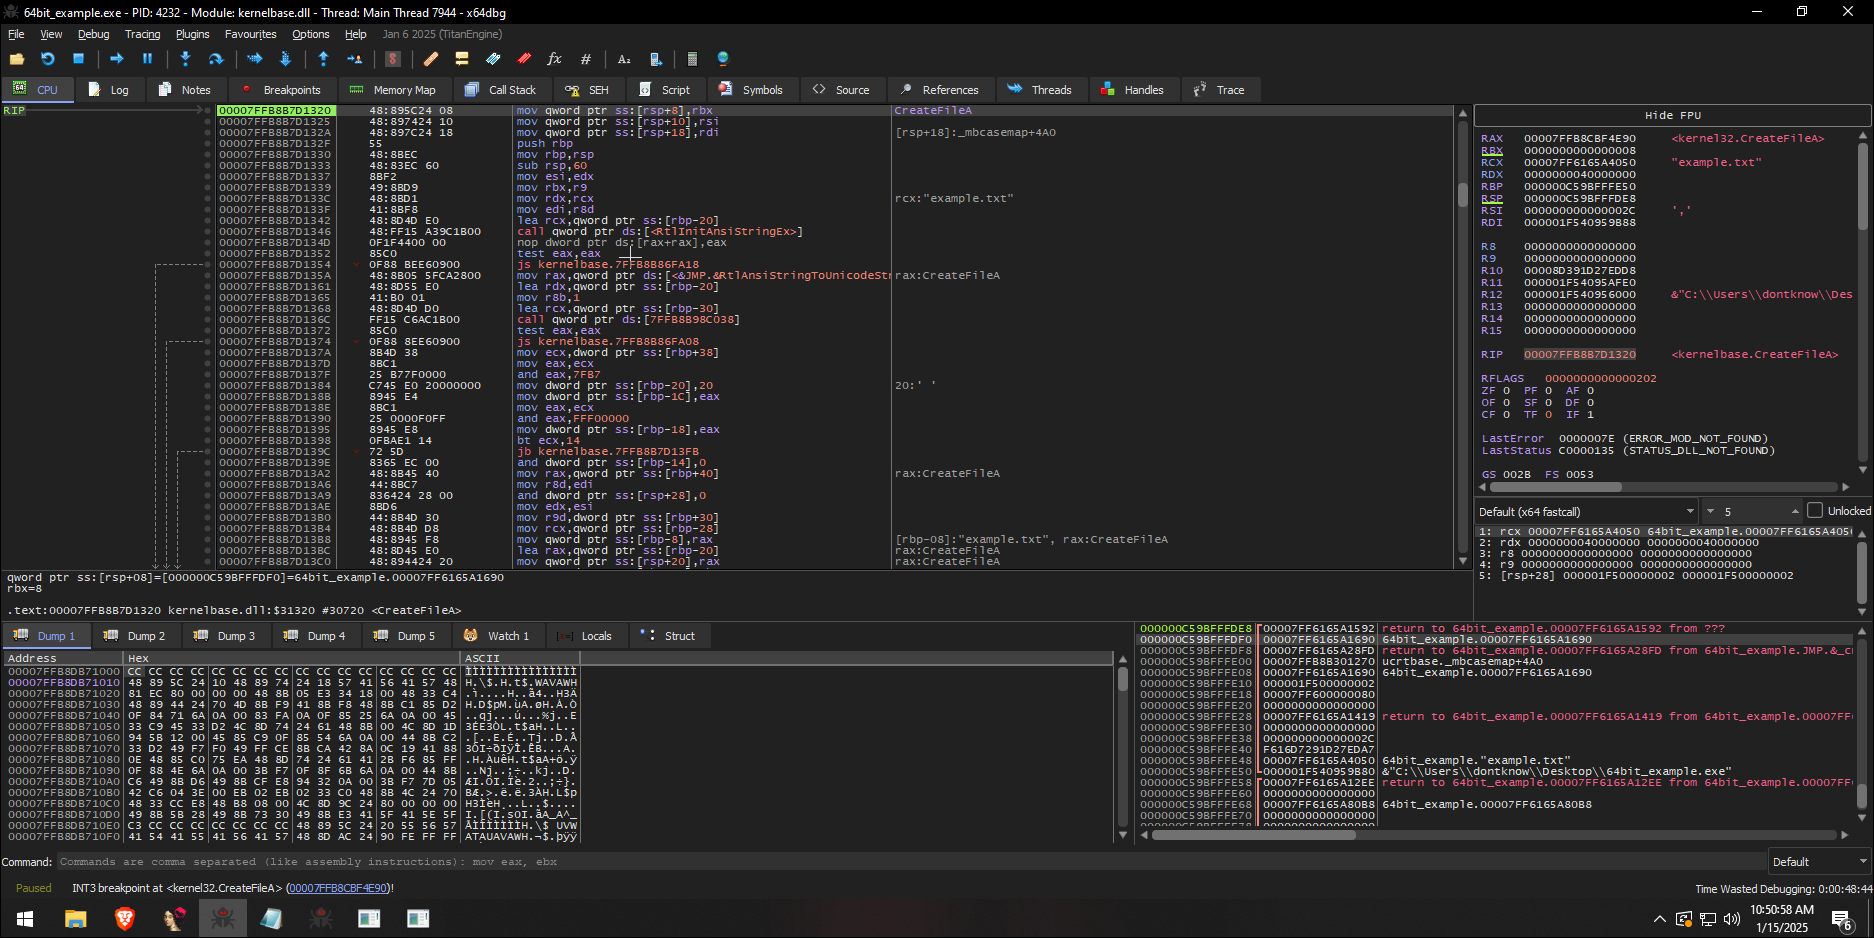
The decompiled code from the assembly above look like this:
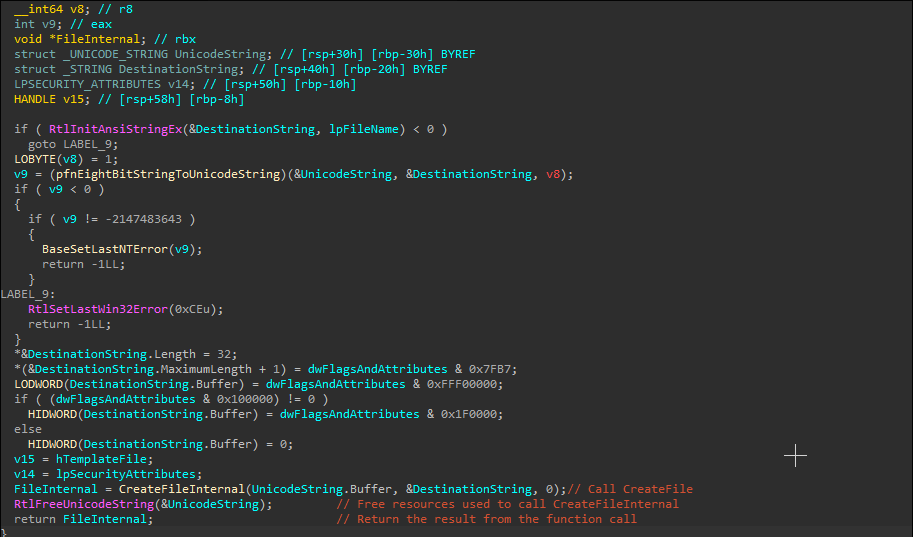
As you can see, kernelbase.dll will convert the ANSI string used for the file name to Unicode, since Windows Kernel operates using this type, set some values and flags to DestinationString and then call kernelbase.dll!CreateFileInternal.
kernelbase.dll!CreateFileInternal will have even more code that will probably take care of parameter validation, errors handling in case it fails, path handling, set the right options and flags and make sure that the call to ntdll.dll!NtCreateFile which will call the kernel is valid, part of the code where the function call is make is available below.

And finally ntdll.dll, our last destination. Will make the system call to the kernel to create one file.
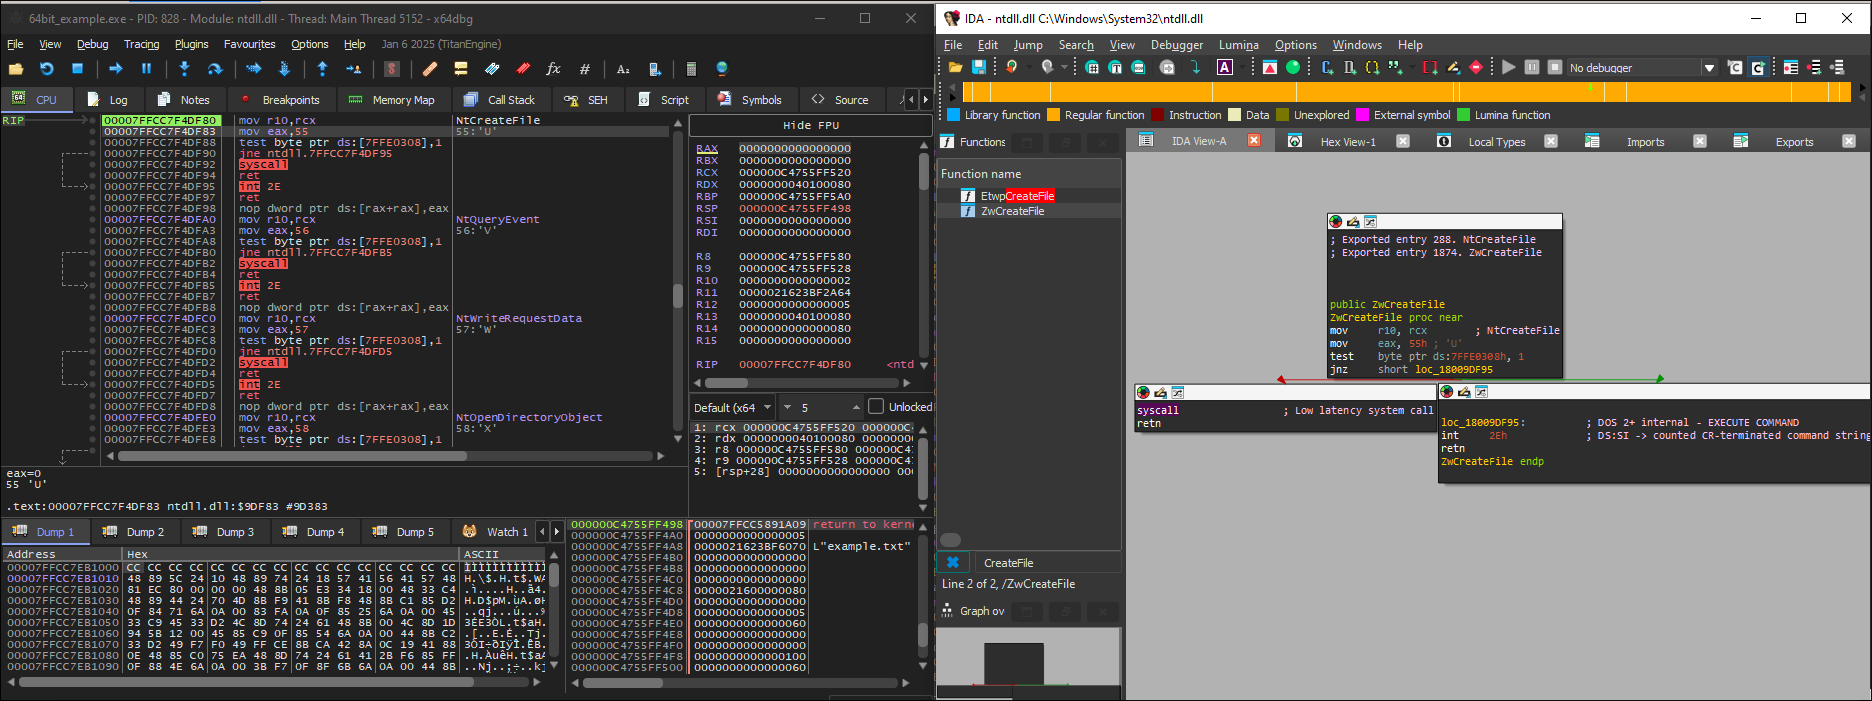
And that’s it, a system call made from a 64-bit process is simple, right? We started at:
example64!main -> kernel32.dll!CreateFileA -> kernelbase.dll!CreateFileA -> kernelbase.dll!CreateFileInternal -> ntdll.dll!NtCreateFile -> syscall to ntoskrnl.exe
Now, we are going to analyze the 32-bit binary and try to spot what is difference between a 64-bit process attempting to make a system call and a 32-bit one.
So again, let’s run our binary inside a debugger to see what is actually happening until we reach the system call. The Birth of a 32-bit process is not that simple as a 64-bit one and although this article aims to explain about WoW64, this is because of the nature of the Heaven’s Gate technique, the birth of a process under the WoW64 is not really necessary in this one of the topics i am not willing to cover here because the chances of me making mistakes are quite high. If you are interested, i really recommend you to check out wbenny’s blog.

So there is one of the differences, take a look and see if you can find it. Yes, you are right! The path is different, but why? WoW64 transparently redirects 32-bit applications to the appropriate paths when a 32-bit process is requesting a resource from C:\Windows\System32, which will be redirect to C:\Windows\SysWOW64\. The same is true for C:Program Files which will be redirect to C:\Program Files (x86). There are exceptions to this like the system directories C:\Windows\System32\drivers and C:\Windows\System32\spool. The redirection is the default behavior of any 32-bit process that is requesting those directories unless the function Kernel32.dll!WoW64DisableWow64FsRedirection() is used.
The same is true for the Windows Registry. The Registry redirection works similarly to file system redirection. When 32-bit applications access certain registry keys, Windows redirects them to specific WOW64 nodes.
Main registry redirections:
- HKEY_LOCAL_MACHINE\Software -> HKEY_LOCAL_MACHINE\Software\Wow6432Node
- HKEY_CLASSES_ROOT\CLSID → HKEY_CLASSES_ROOT\Wow6432Node\CLSID
Like the directories redirection, there are exceptions:
- HKEY_CURRENT_USER\Software\Classes\CLSID
- HKEY_LOCAL_MACHINE\Software\Classes\CLSID
- HKEY_USERS
So now we have the 32-bit version of the KernelBase.dll, Kernel32.dll and ntdll.dll. Let’s see how they differ from the 64-bit sisters.
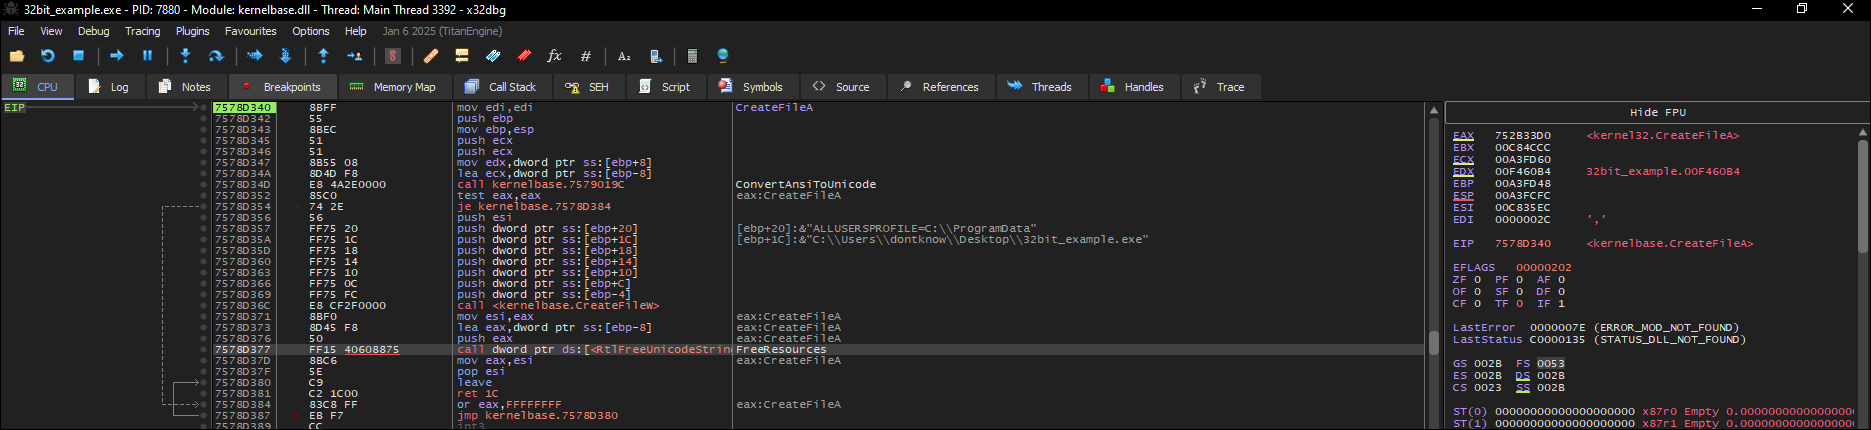
So here we have our main function, the code responsible to pass arguments on the stack, move the address of the CreateFileA to eax register and then call it.

The call instruction will lead us to the 32-bit kernel32.dll!CreateFileA, which will have only one instruction:

This jump will lead us to kernelbase.dll!CreateFileA, this piece of code inside the 32-bit version of the kernelbase.dll is the same as the 64-bit, it will convert the arguments and then, the second call instruction will lead us to the Unicode version of the CreateFile, which is the Kernelbase.dll!CreateFileW.
Kernelbase.dll!CreateFileW will set variables based on the arguments and then it will call CreateFileInternal!CreateFileInternal.
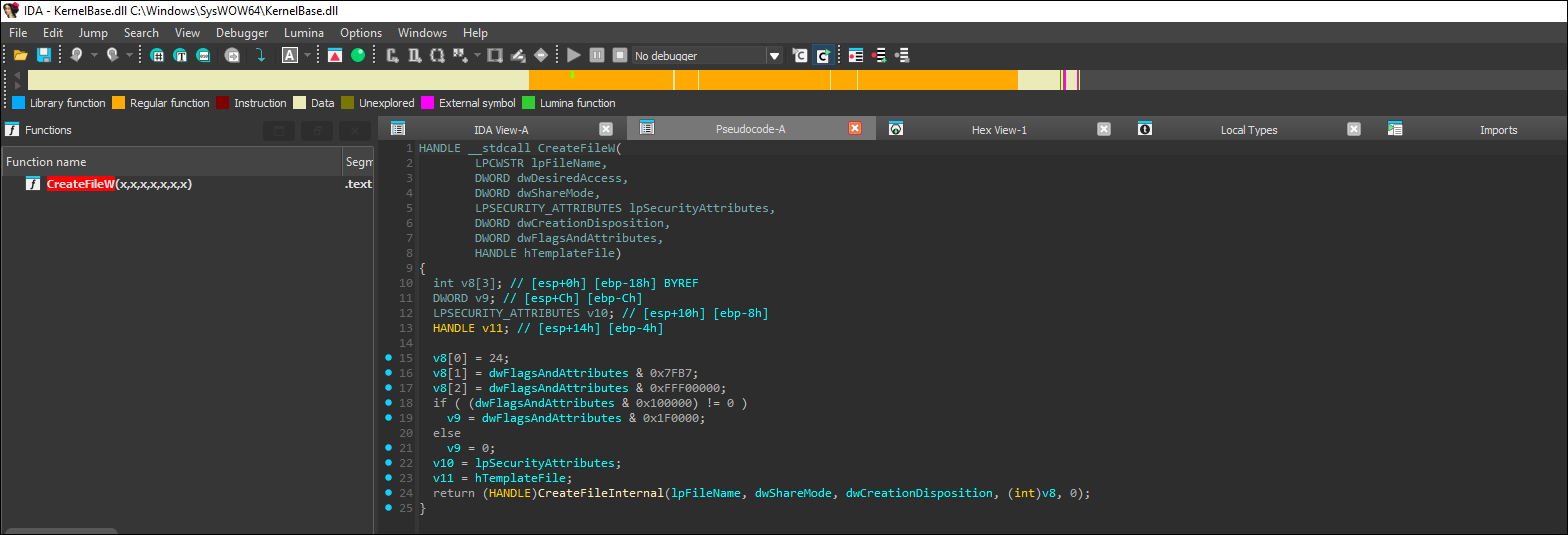
kernelbase.dll!CreateFileInternal is big and in theory it should do the same thing as its 64-bit version (Errors handling, checking arguments and so on), then at some point it will attempt to call ntdll32.dll!NtCreateFile.
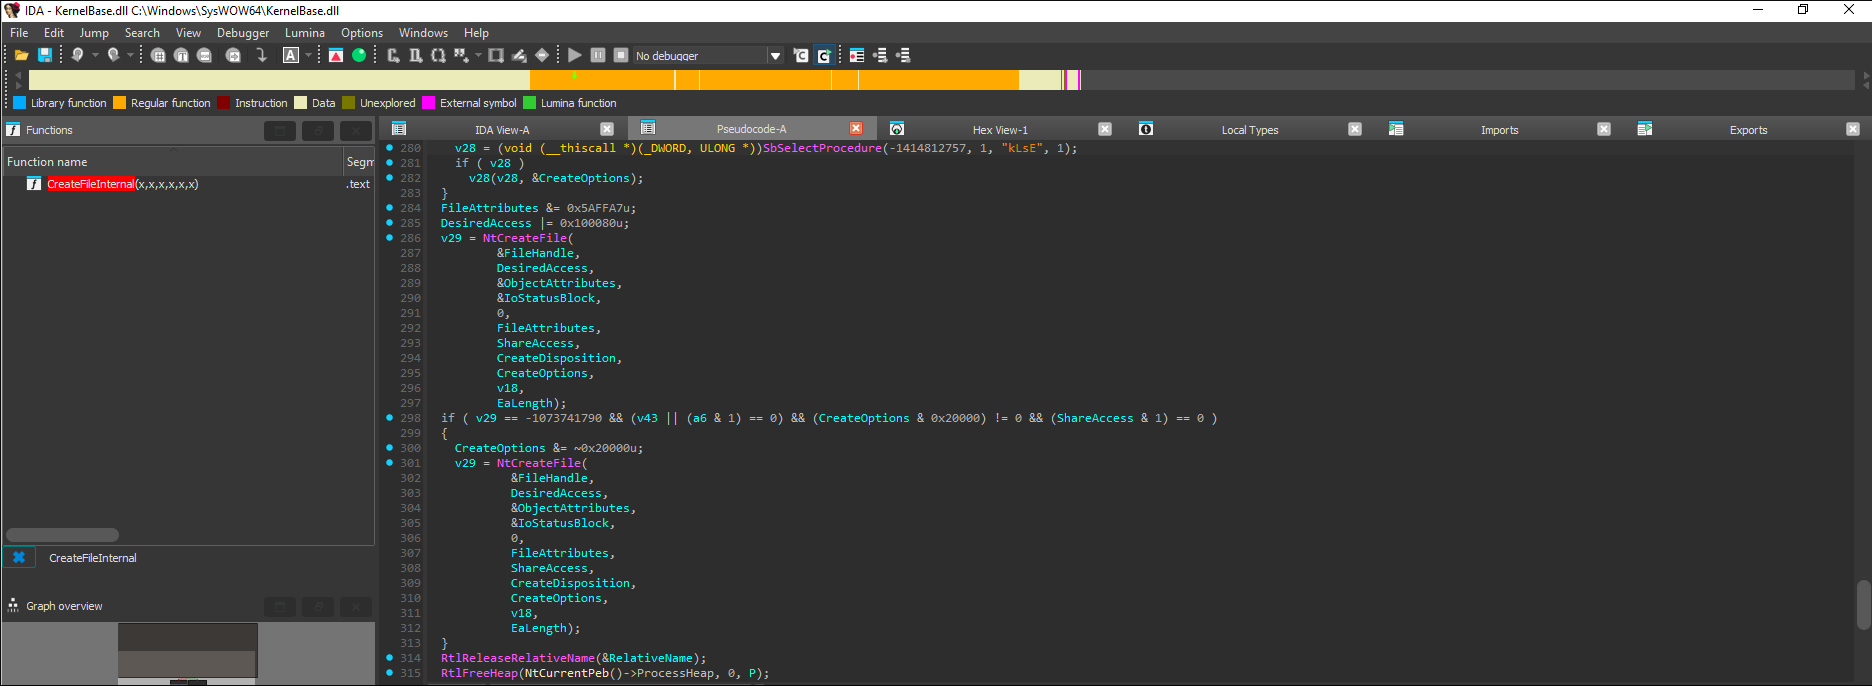
Which if all that i said below is correct, it should not attempt to make the system call and yes call a function that will deal with the transition to the 64-bit mode through WoW64.
Let’s take a look:
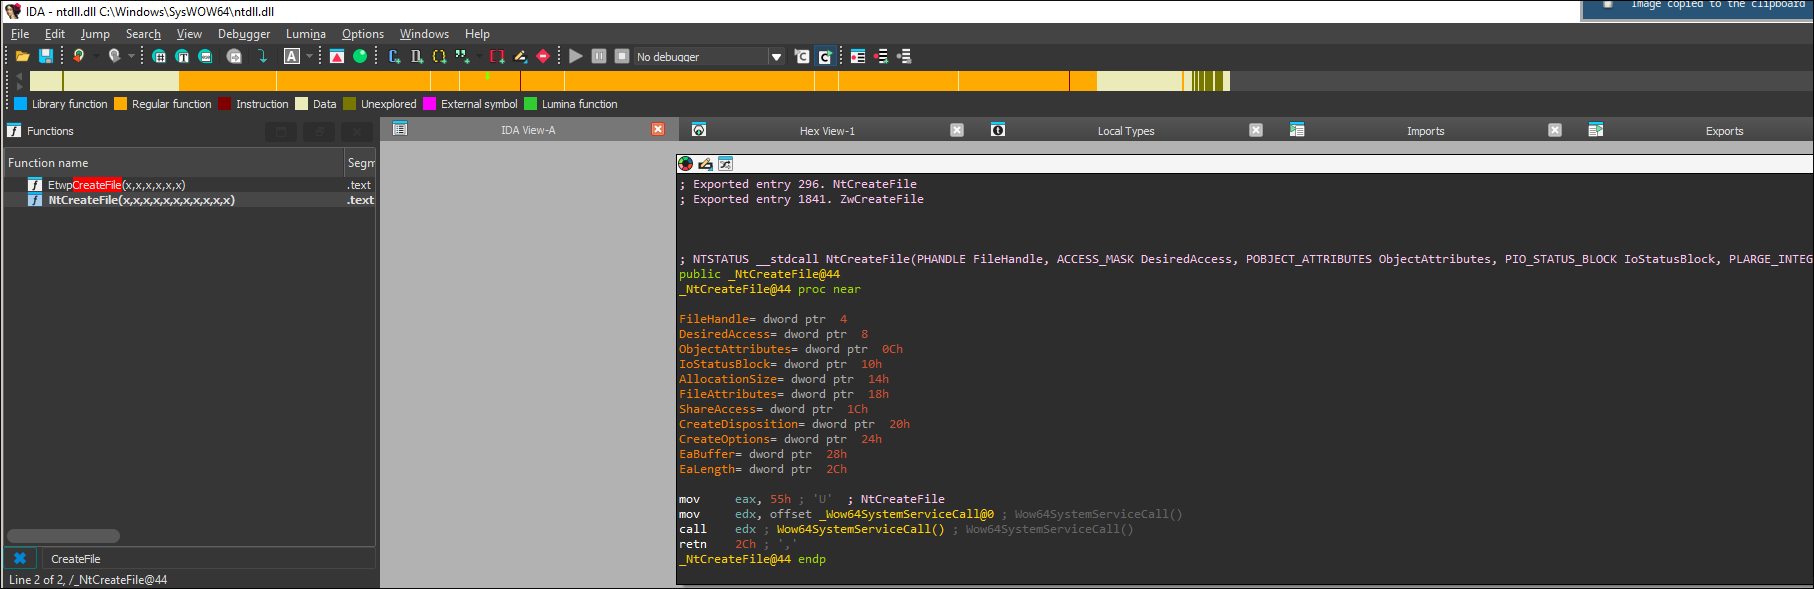
ntdll32.dll!Wow64SystemServiceCall will have a single instruction that will jump to the address of the far jump which is the one responsible to change the code segment and make the transition between 32 and 64 bit mode.

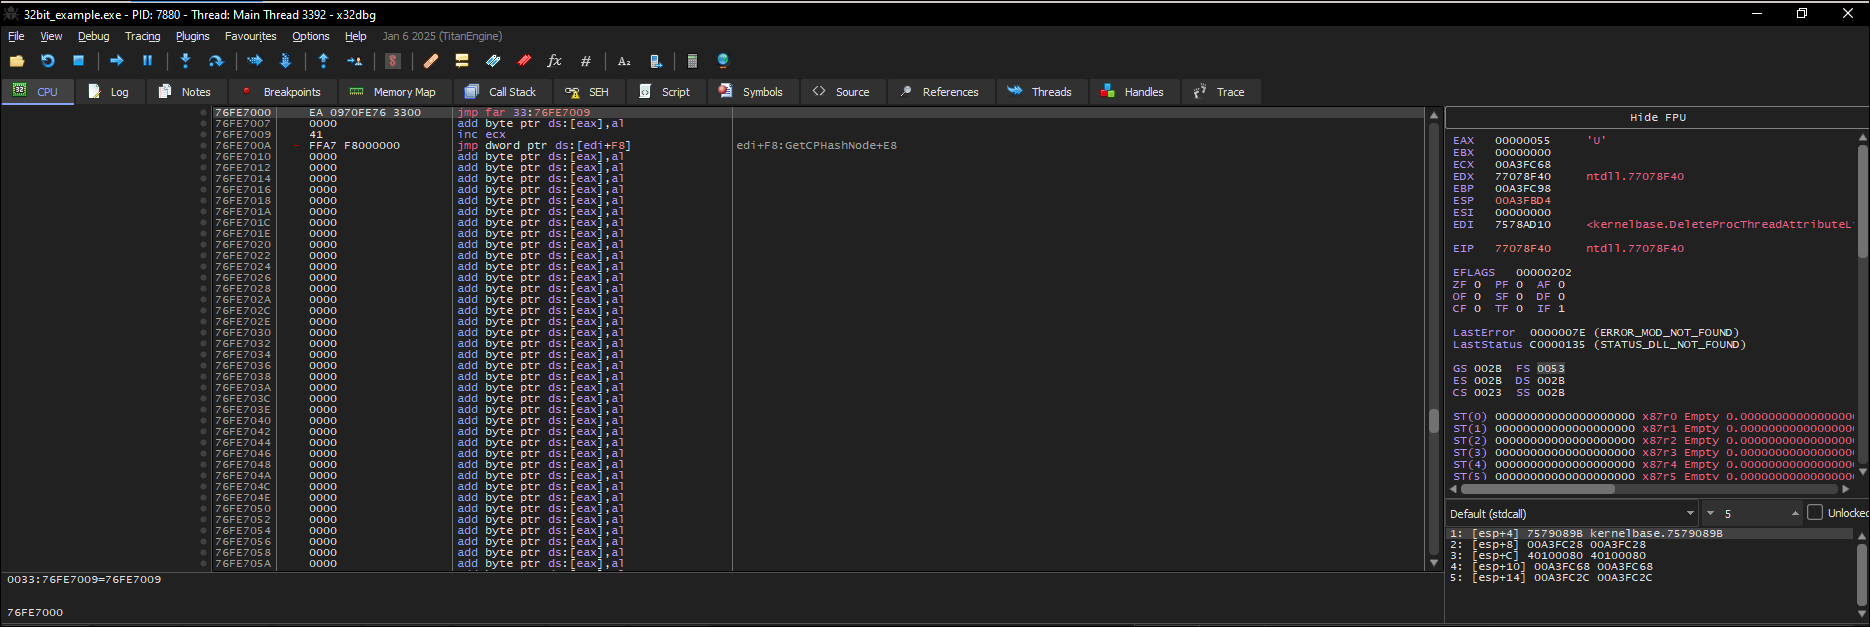
Since x32dbg can’t handle transition between different architectures we are going to change our debugger to WinDbg. If you wanna follow, open WinDbg, open our example binary and enter the commands that have a little red text right after it.
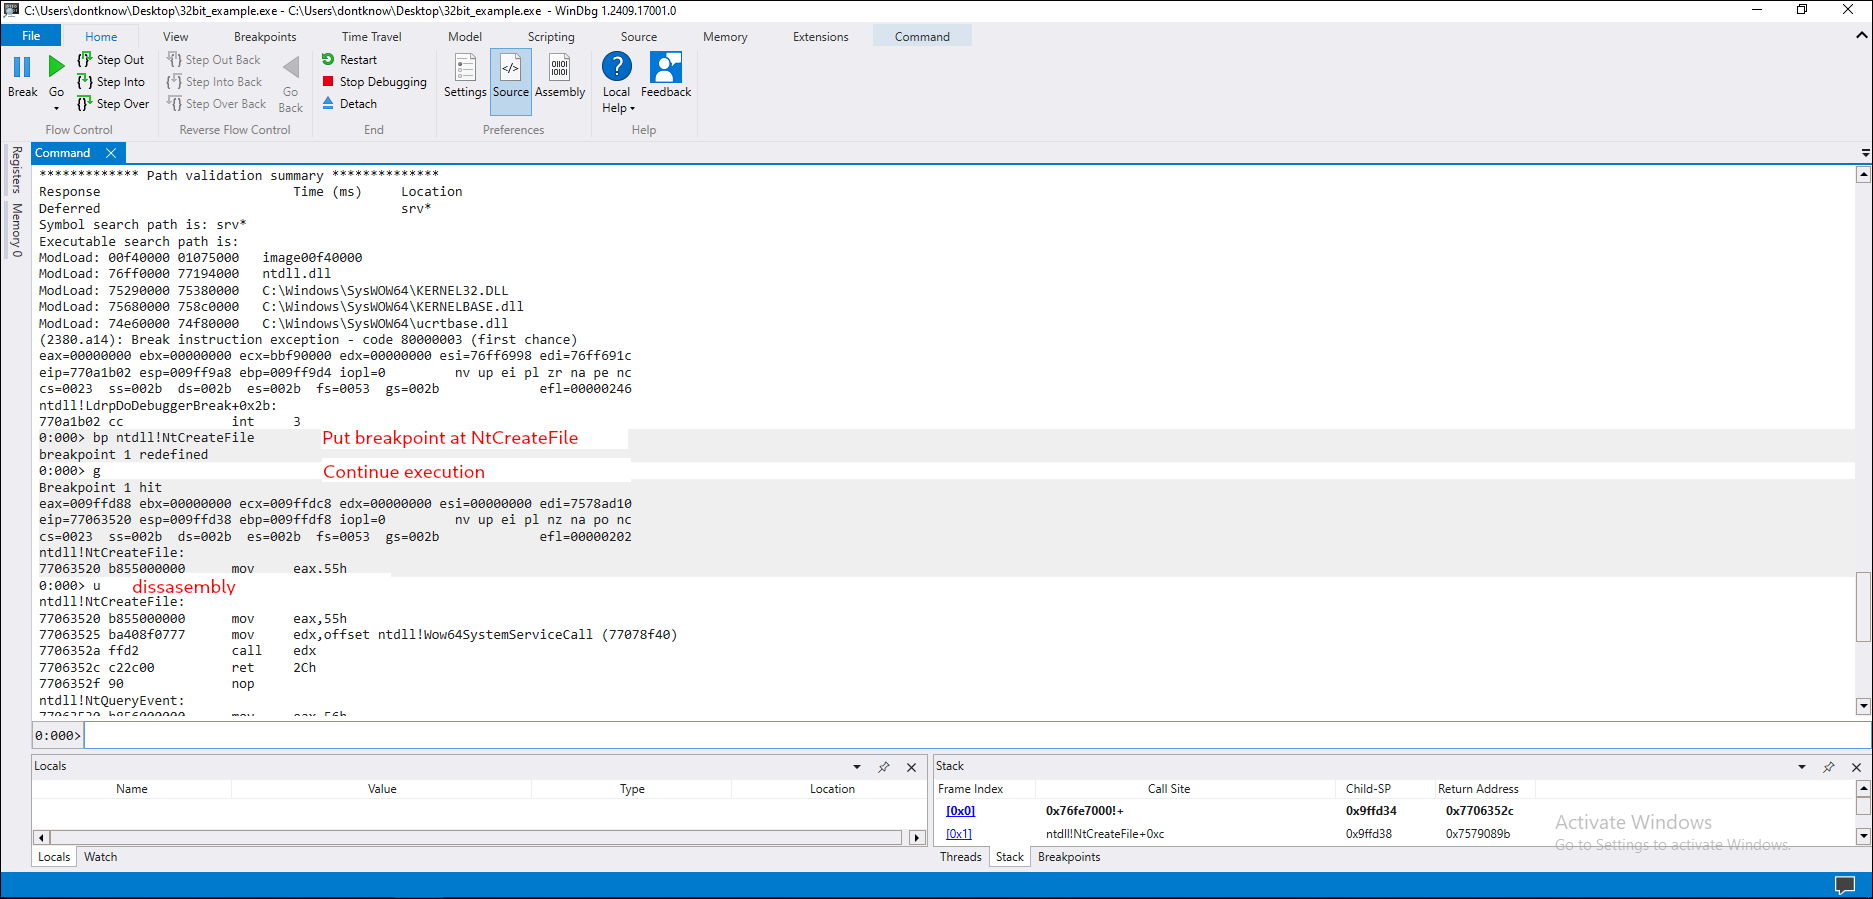
Now keep entering t(Step Into) until we reach our far jump to 64-bit.
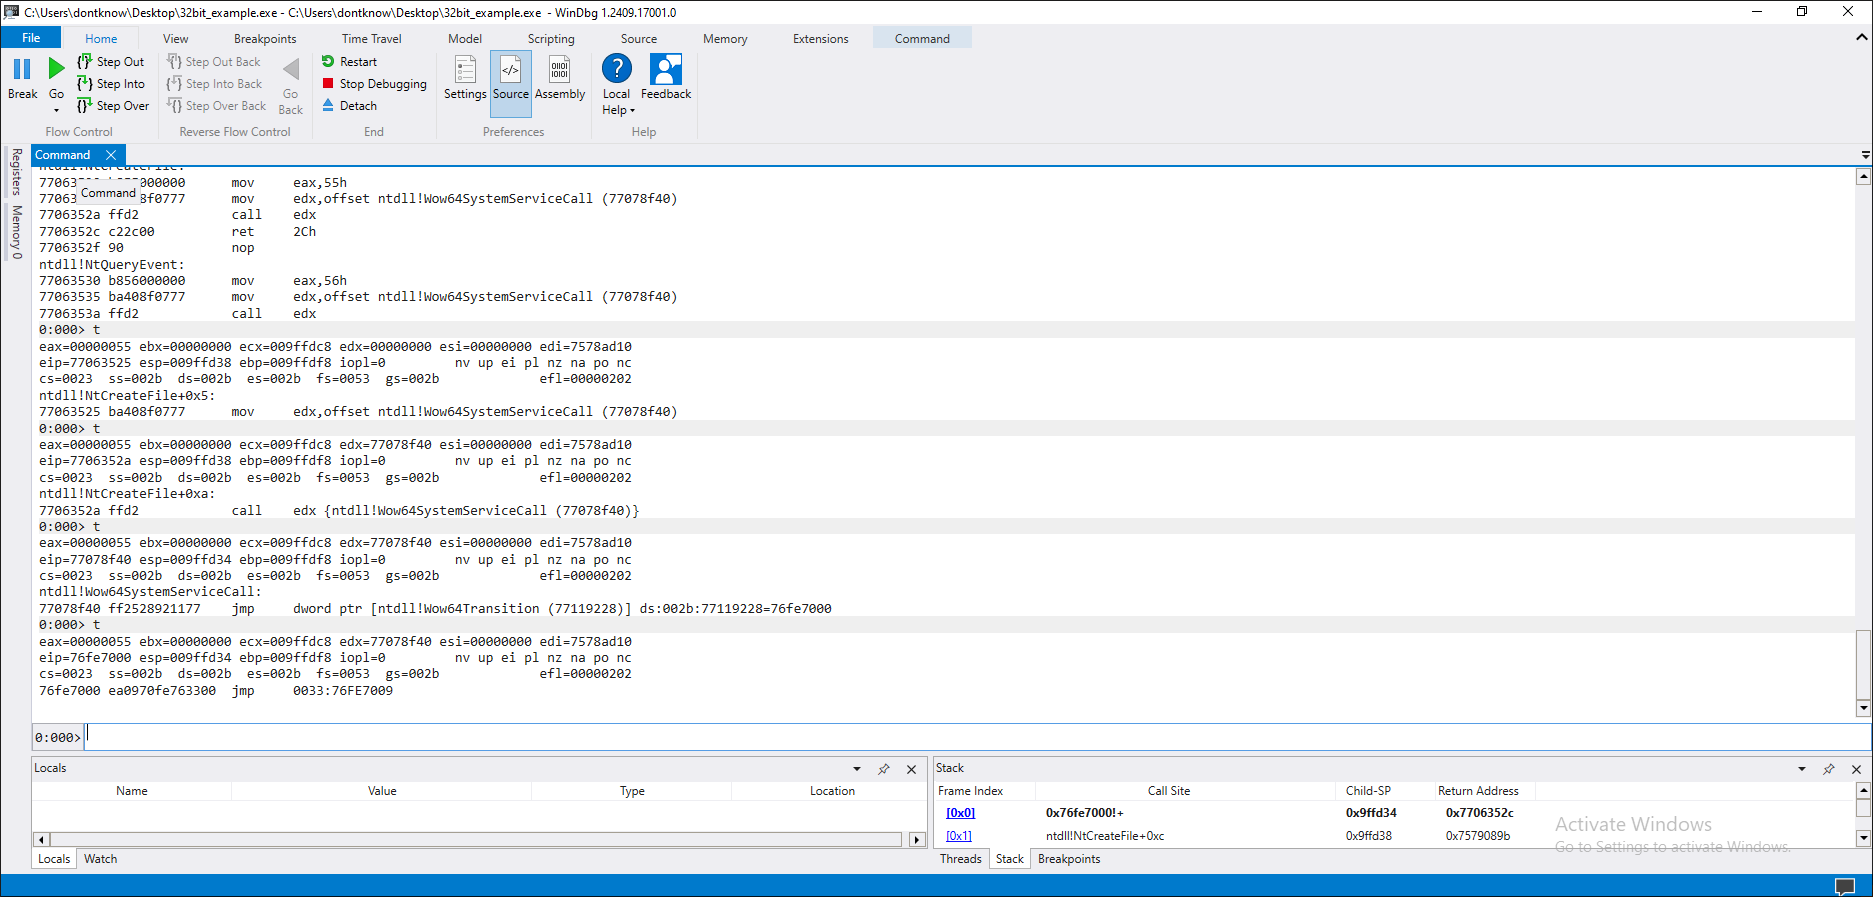
It is a code segment with Read/Execute attributes, usermode privilege (ring 3), and the Long bit is set (that is, the segment is for 64bit mode). So now we know how to switch from 32bit to 64bit, but what about the opposite? Since we are executing a 32bit process, it must be possible to switch back to 32bit from 64bit. If we keep debugging, we will pass through the following APIs:
wow64cpu!CpupReturnFromSimulatedCode wow64cpu!TurboDispatchJumpAddressStart wow64!Wow64SystemServiceEx wow64!whNtCreateFile
and finally land on:
ntdll!NtCreateFile
0033:0000000077121860 4c8bd1 mov r10,rcx 0033:0000000077121863 b852000000 mov eax,52h
0033:0000000077121868 0f05 syscall 0033:000000007712186a c3 ret
The system call itself happens in 64bit mode: in fact, it is not allowed to use a syscall instruction from 32bit mode, or else an exception will be raised. This is an interesting detail, because it tells us that all the APIs that require a transition to kernelmode must switch to 64bit. (Hint: if you can control the switch to 64bit you can implement a cheap API logger ;)) We finish debugging this API and we get to what we were looking for:
32bit -> example32!CreateFile -> kernel32.dll!CreateFileA -> SysWow64kernelbase.dll!CreateFileA -> kernelbase.dll!CreateFileW -> SysWow64Ntdll.dll!NtCreateFile -> SysWow64Ntdll.dll!Wow64SystemServiceCall -> jmp to WoW64Transition -> jmp far 33:Address
Sources: https://cryptohub.nl/zines/vxheavens/lib/-show_abstract=vrg02.html https://cryptohub.nl/zines/vxheavens/lib/apf62.html https://blog.talosintelligence.com/rats-and-stealers-rush-through-heavens/ https://github.com/darkspik3/Valhalla-ezines/blob/master/Valhalla%20%231/articles/HEAVEN.TXT https://wbenny.github.io/2018/11/04/wow64-internals.html